Toyota Yaris: Air Conditioning Amplifier / Installation
INSTALLATION
PROCEDURE
1. INSTALL AIR CONDITIONING AMPLIFIER ASSEMBLY
| (a) Connect the 3 connectors. |
|
(b) Engage the guide to install the air conditioning amplifier assembly.
(c) Install the 3 screws.
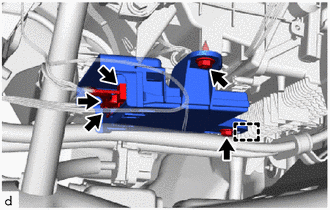
(d) Install the front floor carpet assembly with the 2 clips as shown in the illustration.

2. INSTALL REAR CONSOLE BOX ASSEMBLY
Click here

3. CONNECT CABLE TO NEGATIVE AUXILIARY BATTERY TERMINAL
Click here

4. INITIALIZATION AFTER RECONNECTING AUXILIARY BATTERY TERMINAL
HINT:
When disconnecting and reconnecting the auxiliary battery, there is an automatic learning function that completes learning when the respective system is used.
Click here

5. INITIALIZATION SERVO MOTOR
Click here

6. PERFORM REGISTRATION
Click here

 Removal
REMOVAL CAUTION / NOTICE / HINT The necessary procedures (adjustment, calibration, initialization or registration) that must be performed after parts are removed and installed, or replaced during the air conditioning amplifier assembly removal/installation are shown below...

Other information:
Toyota Yaris XP210 (2020-2026) Reapir and Service Manual: External BBC Circuit (P33B300)
DESCRIPTION When the engine is started (high electrical load) from engine stopped by the stop and start control, the external backup boost converter (eco run vehicle converter assembly) supplements auxiliary battery voltage in order to prevent the function from being disabled due to decrease in power source voltage supplied to the navigation system...
Toyota Yaris XP210 (2020-2026) Reapir and Service Manual: Installation
INSTALLATION PROCEDURE 1. INSTALL NO. 1 COOLER THERMISTOR (a) Install the No. 1 cooler thermistor as shown in the illustration. Installation Position: Part Length A 45 to 55 mm (1.77 to 2.17 in.) B 23 to 27 mm (0.906 to 1.06 in.) C 54...
Categories
- Manuals Home
- Toyota Yaris Owners Manual
- Toyota Yaris Service Manual
- Key Battery Replacement
- Fuel Gauge
- Opening and Closing the Liftgate/Trunk Lid
- New on site
- Most important about car
Fuel Gauge
The fuel gauge shows approximately how much fuel is remaining in the tank when the ignition is switched ON. We recommend keeping the tank over 1/4 full.
