Toyota Yaris: Quarter Window Glass / Installation
INSTALLATION
CAUTION / NOTICE / HINT
NOTICE:
Make sure to use Toyota Genuine Windshield Glass Adhesive (High Modulus Type) or equivalent.
HINT:
- Use the same procedure for the RH side and LH side.
- The following procedure is for the LH side.
PROCEDURE
1. CLEAN QUARTER WINDOW ASSEMBLY
(a) Clean the outer circumference of a new quarter window assembly with a non-residue solvent.
NOTICE:
- Do not touch the quarter window assembly surface after cleaning it.
2. INSTALL QUARTER WINDOW ASSEMBLY
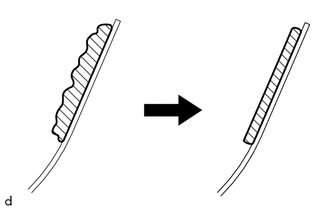
(a) Clean and shape the contact surface of the vehicle body.
(1) Using a knife, cut away excess adhesive on the contact surface of the vehicle body as shown in the illustration.
.png) | Adhesive |
NOTICE:
Be careful not to damage the vehicle body.
HINT:
Leave as much adhesive on the vehicle body as possible.
(2) Clean the contact surface of the vehicle body with a piece of cloth saturated with non-residue solvent.
(b) Install suction cups to the quarter window assembly.
(c) Using a brush or sponge, coat the installation surfaces on the vehicle body with the body primer.
NOTICE:
- Do not coat the adhesive with the body primer.
- Do not apply too much body primer.
- Allow the body primer to dry for 3 minutes or more.
- Throw away any leftover body primer.
(d) Using a brush or a sponge, apply glass primer to the contact surface of the quarter window assembly as shown in the illustration.
NOTICE:
- Do not apply too much glass primer.
- Allow the glass primer to dry for 3 minutes or more.
- Throw away any leftover glass primer.
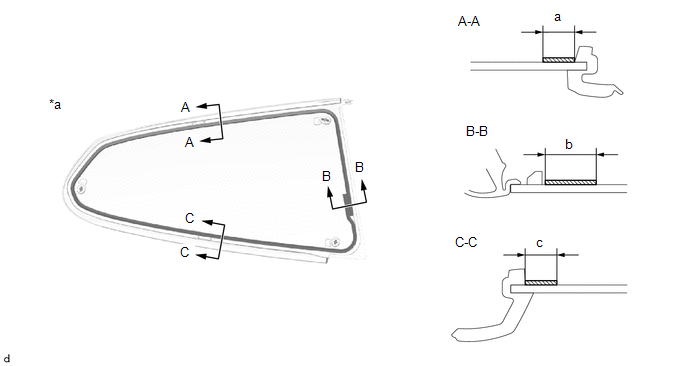
| *a | Back Side of Quarter Window Assembly | - | - |
|
| Glass Primer | - | - |
Standard Dimension:
| Area | Dimension | Area | Dimension |
|---|---|---|---|
| a | 11 mm (0.433 in.) or more | b | 19 mm (0.748 in.) or more |
| c | 11 mm (0.433 in.) or more | - | - |
(e) Prepare to apply adhesive to the quarter window assembly.
Adhesive:
Toyota Genuine Windshield Glass Adhesive (High modulus type) or equivalent
(1) Cut off the tip of the cartridge nozzle as shown in the illustration.
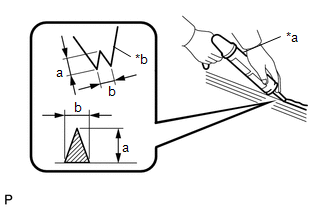
| *a | Sealer Gun |
| *b | Cartridge Nozzle |
|
| Adhesive |
Standard Dimension:
| Area | Dimension |
|---|---|
| a | 12 to 15 mm (0.472 to 0.591 in.) |
| b | 8.0 to 11 mm (0.315 to 0.433 in.) |
(2) Load the sealer gun with the cartridge.
(f) Apply adhesive to the quarter window glass as shown in the illustration.
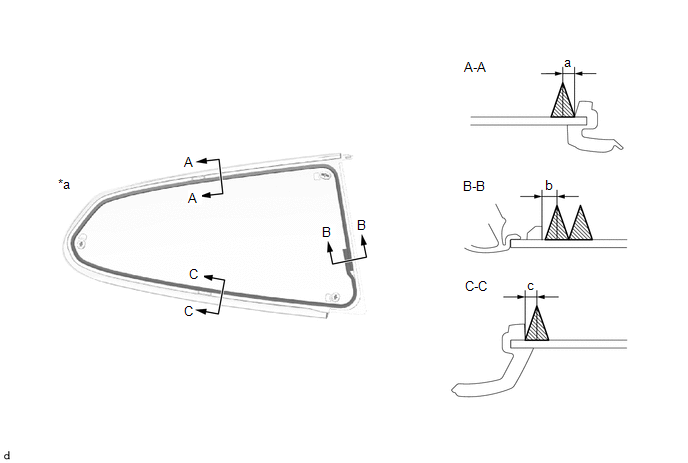
| *a | Back Side of Quarter Window Assembly | - | - |
|
| Adhesive | - | - |
Standard Dimension:
| Area | Dimension | Area | Dimension |
|---|---|---|---|
| a | 4.0 mm (0.157 in.) | b | 4.0 mm (0.157 in.) |
| c | 4.0 mm (0.157 in.) | - | - |
(g) Install the quarter window assembly to the vehicle body.
| (1) Engage the clips to install the quarter window assembly. NOTICE:
|
|
.png)
(2) Lightly press the outer surface of the quarter window assembly to ensure that the quarter window assembly is securely fit to the vehicle body.
HINT:
Press the glass with a force of 98 N (10 kgf, 22.0 lbf) or more.
(3) Using a scraper, remove any excess or protruding adhesive.
(4) Hold the quarter window assembly using protective tape until the applied adhesive becomes hard.
HINT:
Follow the instructions supplied by the adhesive manufacturer or in the corresponding instruction manual for the minimum amount of time necessary to wait before driving the vehicle.
(h) for RH Side:
(1) Connect the connector.
3. INSTALL FRONT ROOF SIDE RAIL WEATHERSTRIP RETAINER
Click here
.gif)
4. INSPECT FOR LEAK
(a) After the adhesive has hardened, apply water from the outside of the vehicle. Check that no water leaks into the cabin.
(b) If water leaks into the cabin, allow the water to dry and add adhesive.
(c) Remove the protective tape.
5. INSTALL ROOF SIDE INNER GARNISH
Click here
6. INSTALL CENTER PILLAR UPPER GARNISH
Click here
7. INSTALL INNER ROOF SIDE GARNISH
Click here
 Removal
REMOVAL CAUTION / NOTICE / HINT NOTICE: Make sure to use Toyota Genuine Windshield Glass Adhesive (High Modulus Type) or equivalent. HINT:
Use the same procedure for the RH side and LH side...

Other information:
Toyota Yaris XP210 (2020-2026) Reapir and Service Manual: Generator "A" Mechanical Performance Mechanical Failure (P065C07)
DESCRIPTION The alternator performs self-diagnosis of its internal circuits to detect malfunctions (open or short circuits). The ECM receives the result via LIN communication and stores a DTC. DTC No. Detection Item DTC Detection Condition Trouble Area MIL Note P065C07 Generator "A" Mechanical Performance Mechanical Failure All of the following conditions are met (1 trip detection logic): Engine running (except during engine cranking)...
Toyota Yaris XP210 (2020-2026) Owner's Manual: Overheating
If the high engine coolant temperature warning light turns on, the vehicle loses power, or you hear a loud knocking or pinging noise, the engine is probably too hot. If the high engine coolant temperature warning light turns on: Drive safely to the side of the road and park off the right-of-way...
Categories
- Manuals Home
- Toyota Yaris Owners Manual
- Toyota Yaris Service Manual
- Engine Start Function When Key Battery is Dead
- How to connect USB port/Auxiliary jack
- To Set Speed
- New on site
- Most important about car
Fuel-Filler Lid and Cap
WARNING
When removing the fuel-filler cap, loosen the cap slightly and wait for any hissing to stop, then remove it
Fuel spray is dangerous. Fuel can burn skin and eyes and cause illness if ingested. Fuel spray is released when there is pressure in the fuel tank and the fuel-filler cap is removed too quickly.