Toyota Yaris: Front Door Opening Trim Weatherstrip / Installation
INSTALLATION
CAUTION / NOTICE / HINT
HINT:
- Use the same procedure for the LH side and RH side.
- The following procedure is for the LH side.
PROCEDURE
1. INSTALL FRONT DOOR OPENING TRIM WEATHERSTRIP
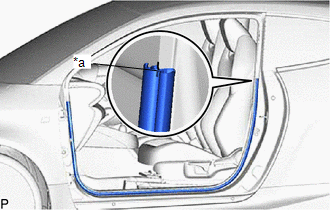
| (a) Align the edge of the front door opening trim weatherstrip with the reference cutout of the body, and install the front door opening trim weatherstrip. NOTICE: After installation, check that the corners fit correctly. |
|
2. INSTALL FRONT ROOF SIDE RAIL WEATHERSTRIP RETAINER
(a) Insert the front roof side rail weatherstrip retainer into the clip portion of the quaeter window assembly as shown in the illustration.
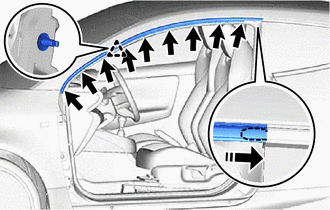
.png) | Install in this Direction |
(b) Engage the clip to install the front roof side rail weatherstrip retainer.
(c) Install the 9 screws in order from the rear of the vehicle.
3. INSTALL ROOF SIDE RAIL WEATHERSTRIP
HINT:
When installing the name plates, heat the vehicle body and roof side rail weatherstrip using a heat light.
Heating Temperature| Item | Temperature |
|---|---|
| Vehicle Body | 40 to 60°C (104 to 140°F) |
| Roof Side Rail Weatherstrip | 20 to 30°C (68 to 86°F) |
CAUTION:
- Do not touch the heat light and heated parts, touching the heat light may result in burns.
- Touching heated parts for a long time may result in burns.
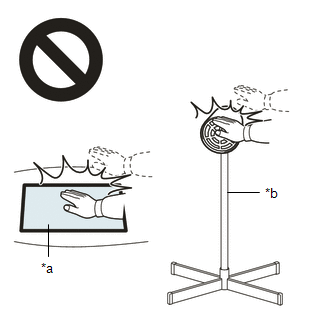
| *a | Heated Part |
| *b | Heat Light |
NOTICE:
Do not heat the vehicle body or roof side rail weatherstrip excessively.
(a) Clean the vehicle body surface.
(1) Using a heat light, heat the vehicle body surface.
(2) Remove any remaining double-sided tape from the vehicle body.
(3) Wipe off any tape adhesive residue with cleaner.
(b) Using a heat light, heat the vehicle body and roof side rail weatherstrip.
(c) Engage the clip (A).
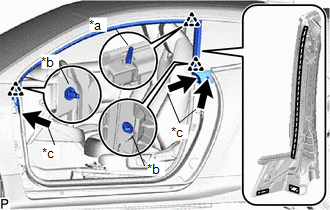
| *a | Clip (A) |
| *b | Clip (B) |
| *c | Clip (C) |
 | Double-sided Tape |
(d) Engage the clips (B).
(e) Remove the release paper from a new roof side rail weatherstrip.
HINT:
After removing the release paper, keep the exposed adhesive free from foreign matter.
(f) Install the roof side rail weatherstrip wiht the 3 clips (C).
4. INSTALL COWL SIDE TRIM BOARD
Click here
.gif)
5. INSTALL FRONT DOOR SCUFF PLATE
Click here
 Removal
REMOVAL CAUTION / NOTICE / HINT HINT:
Use the same procedure for the LH side and RH side.
The following procedure is for the LH side.
PROCEDURE 1...
 Fuel Lid Lock Control Cable Assembly
ComponentsCOMPONENTS ILLUSTRATION
*1 FUEL LID LOCK OPEN LEVER SUB-ASSEMBLY *2 FUEL FILLER OPENING LID LOCK RETAINER *3 FUEL LID LOCK CONTROL CABLE SUB-ASSEMBLY - - RemovalREMOVAL PROCEDURE 1...
Other information:
Toyota Yaris XP210 (2020-2026) Reapir and Service Manual: Lost Communication with ECM/PCM "A" Missing Message (U010087,U012987,U014087,U015587,U110387,U111787)
DESCRIPTION These DTCs are stored when there is a CAN communication malfunction between the certification ECU (smart key ECU assembly) and ECM, main body ECU (multiplex network body ECU) or combination meter assembly. DTC No. Detection Item DTC Detection Condition Trouble Area Note U010087 Lost Communication with ECM/PCM "A" Missing Message CAN communication malfunction between certification ECU (smart key ECU assembly) and ECM (1-trip detection logic*) ECM Turn the ignition switch to ON and wait at least 10 seconds...
Toyota Yaris XP210 (2020-2026) Owner's Manual: Call Interrupt
A call can be interrupted to receive an incoming call from a third party. When is selected or the pick-up button on the steering wheel is pressed, the current call is held and the system switches to the new incoming call. When is selected, the current call is ended and the system switches to the new incoming call (GSM network only)...
Categories
- Manuals Home
- Toyota Yaris Owners Manual
- Toyota Yaris Service Manual
- Key Battery Replacement
- Fuel Gauge
- Adjustment
- New on site
- Most important about car
Keys

To use the auxiliary key, press the knob and pull out the auxiliary key from the smart key.
