Toyota Yaris: Lighting (int) / Front Door Courtesy Switch
Components
COMPONENTS
ILLUSTRATION

| *1 | FRONT DOOR COURTESY LIGHT SWITCH ASSEMBLY | - | - |
 | N*m (kgf*cm, ft.*lbf): Specified torque | - | - |
Removal
REMOVAL
CAUTION / NOTICE / HINT
HINT:
- Use the same procedure for the RH side and LH side.
- The following procedure is for the LH side.
PROCEDURE
1. REMOVE DECK TRIM SIDE PANEL ASSEMBLY
Click here

2. REMOVE FRONT DOOR COURTESY LIGHT SWITCH ASSEMBLY
| (a) Disconnect the connector. |
|
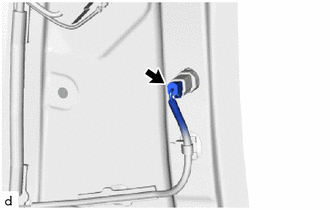
| (b) Using a T30 "TORX" socket wrench, remove the screw and front door courtesy light switch assembly. |
|
Inspection
INSPECTION
PROCEDURE
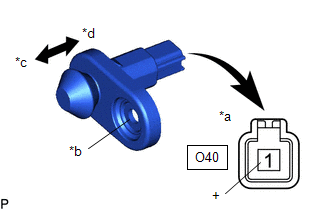
1. INSPECT FRONT DOOR COURTESY LIGHT SWITCH ASSEMBLY (for RH Side)
(a) Check the resistance.
| (1) Measure the resistance according to the value(s) in the table below. Standard Resistance:
If the result is not as specified, replace the front door courtesy light switch assembly. |
|
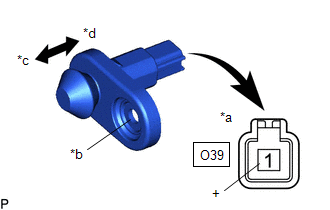
2. INSPECT FRONT DOOR COURTESY LIGHT SWITCH ASSEMBLY (for LH Side)
(a) Check the resistance.
| (1) Measure the resistance according to the value(s) in the table below. Standard Resistance:
If the result is not as specified, replace the front door courtesy light switch assembly. |
|
Installation
INSTALLATION
CAUTION / NOTICE / HINT
HINT:
- Use the same procedure for the RH side and LH side.
- The following procedure is for the LH side.
PROCEDURE
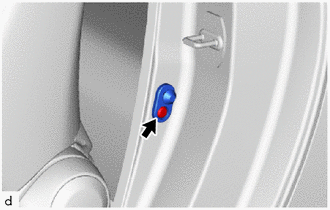
1. INSTALL FRONT DOOR COURTESY LIGHT SWITCH ASSEMBLY
(a) Using a T30 "TORX" socket wrench, install the front door courtesy light switch assembly with the screw.
Torque:
6.3 N·m {64 kgf·cm, 56 in·lbf}
(b) Connect the connector.
2. INSTALL DECK TRIM SIDE PANEL ASSEMBLY
Click here

 Back Door Courtesy Switch
ComponentsCOMPONENTS ILLUSTRATION
*1 BACK DOOR LOCK ASSEMBLY WITH COURTESY LIGHT SWITCH *2 BACK DOOR TRIM BOARD
N*m (kgf*cm, ft.*lbf): Specified torque
MP grease RemovalREMOVAL CAUTION / NOTICE / HINT Click here
InspectionINSPECTION PROCEDURE 1...

Other information:
Toyota Yaris XP210 (2020-2026) Reapir and Service Manual: Power Steering Control Module Processor System Internal Failure (C05D604,...,C15D362)
DESCRIPTION DTC No. Detection Item DTC Detection Condition Trouble Area Warning Indicate Return-to-normal Condition Note C05D604 Power Steering Control Module Processor System Internal Failure ECU internal malfunction (CPU malfunction) Power steering ECU assembly EPS warning light: Comes on Ignition switch ON again - C05D646 Power Steering Control Module Processor Calibration / Parameter Memory Failure ECU internal malfunction (EEPROM error) Power steering ECU assembly EPS warning light: Comes on Ignition switch ON again - C05D649 Power Steering Control Module Processor Internal Electronic Failure ECU internal malfunction (Peripheral circuit malfunction) Power steering ECU assembly EPS warning light: Comes on Ignition switch ON again - C10001C Control Module Internal Temperature Sensor "A" Circuit Voltage Out of Range ECU temperature sensor "A" range malfunction Power steering ECU assembly EPS warning light: Comes on The ECU judges the system has returned to normal - C152A18 Power Steering Motor "A" Circuit Current Below Threshold Motor "A" low current malfunction Power steering ECU assembly EPS warning light: Comes on Ignition switch ON again - C152A19 Power Steering Motor "A" Circuit Current Above Threshold Motor "A" overcurrent Power steering ECU assembly EPS warning light: Comes on Ignition switch ON again - C152B18 Power Steering Motor "B" Circuit Current Below Threshold Motor "B" low current malfunction Power steering ECU assembly EPS warning light: Comes on Ignition switch ON again - C152B19 Power Steering Motor "B" Circuit Current Above Threshold Motor "B" overcurrent Power steering ECU assembly EPS warning light: Comes on Ignition switch ON again - C153A00 Malfunction of Power Steering Motor "A" Inverter Pre-Driver Inverter "A" pre-driver circuit malfunction Power steering ECU assembly EPS warning light: Comes on Ignition switch ON again - C153A19 Power Steering Motor "A" Inverter Circuit Current Above Threshold Inverter "A" short circuit malfunction Power steering ECU assembly EPS warning light: Comes on Ignition switch ON again - C153B00 Malfunction of Power Steering Motor "B" Inverter Pre-Driver Inverter "B" pre-driver circuit malfunction Power steering ECU assembly EPS warning light: Comes on Ignition switch ON again - C153B19 Power Steering Motor "B" Inverter Circuit Current Above Threshold Inverter "B" short circuit malfunction Power steering ECU assembly EPS warning light: Comes on Ignition switch ON again - C154A7E Power Supply & Contrary Connection Protection Relay "A" Actuator Stuck On Contrary connection protection relay "A" short circuit malfunction (initial check) Power steering ECU assembly EPS warning light: Comes on Ignition switch ON again - C154A7F Power Supply & Contrary Connection Protection Relay "A" Actuator Stuck Off Contrary connection protection relay "A" open circuit malfunction (initial check) Power steering ECU assembly EPS warning light: Comes on Ignition switch ON again - C154B7E Power Supply & Contrary Connection Protection Relay "B" Actuator Stuck On Contrary connection protection relay "B" short circuit malfunction (initial check) Power steering ECU assembly EPS warning light: Comes on Ignition switch ON again - C154B7F Power Supply & Contrary Connection Protection Relay "B" Actuator Stuck Off Contrary connection protection relay "B" open circuit malfunction (initial check) Power steering ECU assembly EPS warning light: Comes on Ignition switch ON again - C157A11 Power Steering Motor "A" Current Sensor Circuit Short to Ground Motor "A" current sensor low voltage malfunction Power steering ECU assembly EPS warning light: Comes on Ignition switch ON again - C157A62 Power Steering Motor "A" Current Sensor Signal Compare Failure Motor "A" current sensor correlation malfunction Power steering ECU assembly EPS warning light: Comes on Ignition switch ON again - C157B11 Power Steering Motor "B" Current Sensor Circuit Short to Ground Motor "B" current sensor low voltage malfunction Power steering ECU assembly EPS warning light: Comes on Ignition switch ON again - C157B62 Power Steering Motor "B" Current Sensor Signal Compare Failure Motor "B" current sensor correlation malfunction Power steering ECU assembly EPS warning light: Comes on Ignition switch ON again - C15D11C Power Steering Motor Position Sensor "A" Circuit Voltage Out of Range Rotation angle sensor "A" range malfunction Power steering ECU assembly EPS warning light: Comes on Ignition switch ON again - C15D162 Power Steering Motor Position Sensor "A" Signal Compare Failure Rotation angle sensor "A" correlation malfunction Power steering ECU assembly EPS warning light: Comes on Ignition switch ON again - C15D21C Power Steering Motor Position Sensor "B" Circuit Voltage Out of Range Rotation angle sensor "B" range malfunction Power steering ECU assembly EPS warning light: Comes on Ignition switch ON again - C15D262 Power Steering Motor Position Sensor "B" Signal Compare Failure Rotation angle sensor "B" correlation malfunction Power steering ECU assembly EPS warning light: Comes on Ignition switch ON again - C15D31C Power Steering Motor Position Sensor "C" Circuit Voltage Out of Range Rotation angle sensor "C" range malfunction Power steering ECU assembly EPS warning light: Comes on Ignition switch ON again - C15D362 Power Steering Motor Position Sensor "C" Signal Compare Failure Rotation angle sensor "C" correlation malfunction Power steering ECU assembly EPS warning light: Comes on Ignition switch ON again - CAUTION / NOTICE / HINT NOTICE: When the power steering ECU assembly has been replaced, perform Power Steering ECU Initial Setting (assist map writing)...
Toyota Yaris XP210 (2020-2026) Reapir and Service Manual: Components
COMPONENTS ILLUSTRATION *1 REAR AXLE SHAFT NUT *2 REAR SPEED SENSOR *3 REAR FLEXIBLE HOSE *4 CAP *5 REAR STABILIZER LINK ASSEMBLY *6 REAR STABILIZER BAR *7 REAR COIL SPRING *8 REAR LOWER COIL SPRING INSULATOR *9 REAR NO...
Categories
- Manuals Home
- Toyota Yaris Owners Manual
- Toyota Yaris Service Manual
- Fuse Panel Description
- Auto Lock/Unlock Function
- Brake System Control Module "A" System Voltage System Voltage Low (C137BA2)
- New on site
- Most important about car
Fuel-Filler Lid and Cap
WARNING
When removing the fuel-filler cap, loosen the cap slightly and wait for any hissing to stop, then remove it
Fuel spray is dangerous. Fuel can burn skin and eyes and cause illness if ingested. Fuel spray is released when there is pressure in the fuel tank and the fuel-filler cap is removed too quickly.