
Toyota Yaris: Parking Brake Assembly / Disassembly
DISASSEMBLY
CAUTION / NOTICE / HINT
HINT:
- Use the same procedure for the LH side and RH side.
- The following procedure is for the LH side.
PROCEDURE
1. REMOVE REAR WHEEL
Click here

2. SEPARATE REAR DISC BRAKE CALIPER ASSEMBLY
Click here

3. REMOVE PARKING BRAKE SHOE ADJUSTING HOLE PLUG
Click here

4. REMOVE REAR DISC
Click here

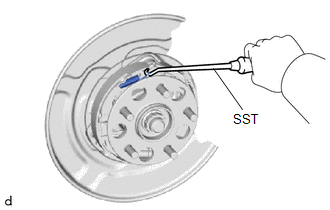
5. REMOVE NO. 3 PARKING BRAKE SHOE RETURN TENSION SPRING
| (a) Using SST, remove the No. 3 parking brake shoe return tension spring. SST: 09921-00011 |
|
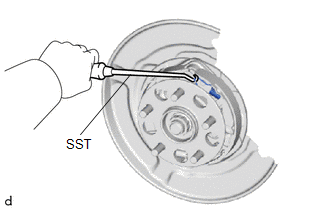
6. REMOVE NO. 2 PARKING BRAKE SHOE RETURN TENSION SPRING
| (a) Using SST, remove the No. 2 parking brake shoe return tension spring. SST: 09921-00011 |
|
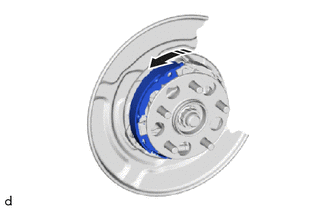
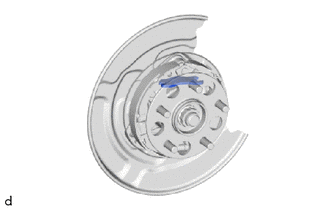
7. REMOVE PARKING BRAKE SHOE STRUT
| (a) Pull the No. 1 parking brake shoe assembly towards the front of the vehicle by hand. |
|
| (b) Remove the parking brake shoe strut. |
|
8. REMOVE NO. 1 PARKING BRAKE SHOE RETURN TENSION SPRING
| (a) Using SST, remove the No. 1 parking brake shoe return tension spring. SST: 09921-00011 |
|
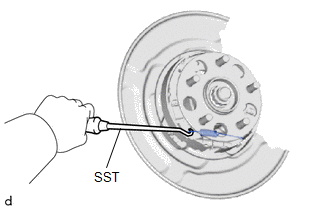
9. REMOVE PARKING BRAKE SHOE ADJUSTING SCREW SET
| (a) Pull the No. 1 parking brake shoe assembly towards the front of the vehicle by hand. |
|
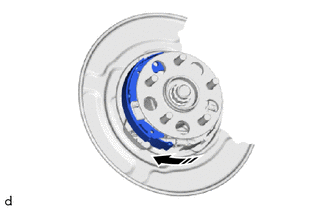
| (b) Remove the parking brake shoe adjusting screw set. |
|
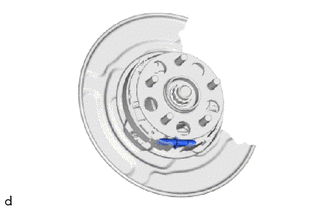
10. REMOVE NO. 1 PARKING BRAKE SHOE ASSEMBLY
| (a) Using SST, remove the parking brake shoe hold down spring, parking brake shoe hold down spring pin and No. 1 parking brake shoe assembly. SST: 09718-00012 |
|
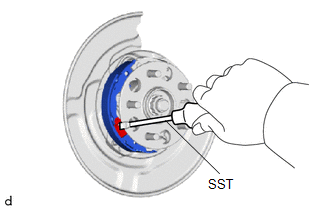
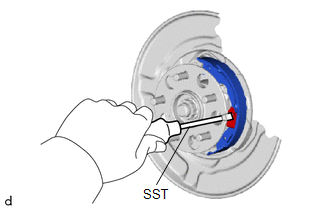
11. REMOVE NO. 2 PARKING BRAKE SHOE ASSEMBLY
| (a) Using SST, remove the parking brake shoe hold down spring and parking brake shoe hold down spring pin, and separate the No. 2 parking brake shoe assembly. SST: 09718-00012 |
|
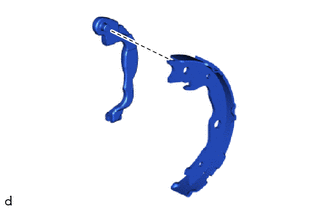
| (b) Pull out the pin of the parking brake shoe lever from the No. 2 parking brake shoe assembly, and remove the No. 2 parking brake shoe assembly. |
|
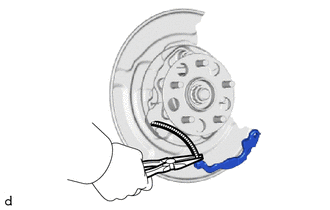
12. REMOVE PARKING BRAKE SHOE LEVER
| (a) Using needle-nose pliers, remove the parking brake shoe lever from the parking brake cable assembly. |
|
 Components
COMPONENTS ILLUSTRATION
*1 PARKING BRAKE SHOE ADJUSTING HOLE PLUG *2 REAR DISC *3 REAR DISC BRAKE CALIPER ASSEMBLY - -
Tightening torque for "Major areas involving basic vehicle performance such as moving/turning/stopping": N*m (kgf*cm, ft...
 Inspection
INSPECTION PROCEDURE 1. INSPECT BRAKE DISC INSIDE DIAMETER (a) Using a brake drum gauge or an equivalent tool, measure the inside diameter of the rear disc...
Other information:
Toyota Yaris XP210 (2020-2026) Reapir and Service Manual: Installation
INSTALLATION CAUTION / NOTICE / HINT HINT: Use the same procedure for the RH side and LH side. The following procedure is for the LH side. PROCEDURE 1. INSTALL FRONT LOWER COIL SPRING INSULATOR (a) Install the front lower coil spring insulator to the front shock absorber assembly...
Toyota Yaris XP210 (2020-2026) Reapir and Service Manual: Parking Brake Cable
ComponentsCOMPONENTS ILLUSTRATION *1 CONSOLE REAR END PANEL SUB-ASSEMBLY *2 PARKING BRAKE CABLE ASSEMBLY ILLUSTRATION *1 NO. 3 PARKING BRAKE CABLE ASSEMBLY *2 NO. 2 PARKING BRAKE CABLE ASSEMBLY *3 PARKING BRAKE SHOE LEVER LH *4 PARKING BRAKE SHOE LEVER RH Tightening torque for "Major areas involving basic vehicle performance such as moving/turning/stopping": N*m (kgf*cm, ft...
Categories
- Manuals Home
- Toyota Yaris Owners Manual
- Toyota Yaris Service Manual
- Fuse Panel Description
- Opening and Closing the Liftgate/Trunk Lid
- Engine & Hybrid System
- New on site
- Most important about car
Fuel-Filler Lid and Cap
WARNING
When removing the fuel-filler cap, loosen the cap slightly and wait for any hissing to stop, then remove it
Fuel spray is dangerous. Fuel can burn skin and eyes and cause illness if ingested. Fuel spray is released when there is pressure in the fuel tank and the fuel-filler cap is removed too quickly.
