
Toyota Yaris: Interior Care / Dashboard Precautions
Toyota Yaris XP210 (2020-2026) Owner's Manual / Maintenance and Care / Appearance Care / Interior Care / Dashboard Precautions
Prevent caustic solutions such as perfume and cosmetic oils from contacting the dashboard. They will damage and discolor the dashboard. If these solutions get on the dashboard, wipe them off immediately.
Instrument panel top
- When cleaning, it is recommended that you use a clean towel dampened in a mild detergent to remove soiling.
- If the surface is rubbed harshly, it could result in the surface being damaged leaving white scratch marks.
NOTICE
Do not use glazing agents.
Glazing agents contain ingredients which may cause discoloration, wrinkling, cracks and peeling.
 Interior Care
WARNING
Do not spray water in the cabin
Splashing water on electrical parts such as the audio unit and switches
is
dangerous as it could cause a malfunction or a fire...
 Cleaning the Upholstery and Interior Trim
Vinyl
Remove dust and loose dirt from vinyl with a whisk broom or vacuum cleaner.
Clean vinyl with a leather-and-vinyl cleaner.
Leather (if equipped)
Remove dust and sand first using a vacuum cleaner or other
means, then wipe dirt off using a soft cloth with a leather cleaner or
a soft cloth soaked in mild soap...
Other information:
Toyota Yaris XP210 (2020-2026) Reapir and Service Manual: System Diagram
S..
Toyota Yaris XP210 (2020-2026) Reapir and Service Manual: Removal
REMOVAL CAUTION / NOTICE / HINT The necessary procedures (adjustment, calibration, initialization, or registration) that must be performed after parts are removed, installed, or replaced during the front suspension crossmember sub-assembly removal/installation are shown below...
Categories
- Manuals Home
- Toyota Yaris Owners Manual
- Toyota Yaris Service Manual
- Auto Lock/Unlock Function
- Power Integration No.1 System Missing Message (B235287,B235587,B235787-B235987)
- To Set Speed
- New on site
- Most important about car
Refueling
Before refueling, close all the doors, windows, and the liftgate/trunk lid, and switch the ignition OFF.
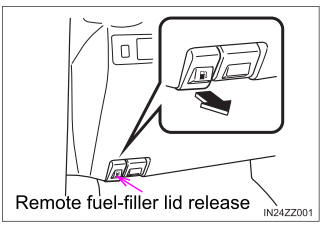
To open the fuel-filler lid, pull the remote fuel-filler lid release.

Copyright © 2026 www.toyaris4.com