Toyota Yaris: Meters and Gauges / Dashboard Illumination
When the position lights are turned on with the ignition switched ON, the brightness of the instrument panel illumination is dimmed.
When the position lights are turned on, the position lights indicator light in the combination meter turns on. Refer to Headlights.
The brightness of the instrument panel and dashboard illuminations can be adjusted by rotating the knob.
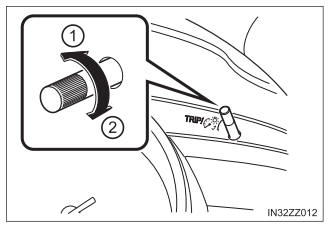
- Dim
The brightness decreases by rotating the knob to the left. A beep sound will be heard when the knob has been rotated to the maximum dim position.
- Bright
The brightness increases by rotating the knob to the right.
Function for cancelling illumination dimmer
The illumination dimmer can be canceled by rotating the dashboard illumination knob to the right until a beep sound is heard while the combination meter is dimmed with the ignition switched ON. If the combination meter’s visibility is reduced due to glare from surrounding brightness, cancel the illumination dimmer.
- When the illumination dimmer is canceled, the combination meter cannot be dimmed even if the position lights are turned on.
- When the illumination dimmer is canceled, the screen in the center display switches to constant display of the daytime screen.
 Fuel Gauge
The fuel gauge shows approximately how much fuel is remaining in
the tank when the ignition is switched ON. We recommend keeping
the tank over 1/4 full...
 Outside Temperature Display
When the ignition is switched ON,
the outside temperature is displayed.
Changing the Temperature Unit of the Outside Temperature
Display
The outside temperature unit can be switched between Celsius and
Fahrenheit...
Other information:
Toyota Yaris XP210 (2020-2026) Reapir and Service Manual: Reassembly
REASSEMBLY PROCEDURE 1. INSTALL CLEAN AIR FILTER (a) Install the clean air filter. NOTICE: Make sure that the "UP" mark is facing the correct direction before installing the clean air filter. 2. INSTALL AIR FILTER COVER PLATE (a) Engage the guides and claw to install the air filter cover plate...
Toyota Yaris XP210 (2020-2026) Reapir and Service Manual: Parts Location
PARTS LOCATION ILLUSTRATION *1 FORWARD RECOGNITION CAMERA (w/ Toyota Safety Sense) *2 MILLIMETER WAVE RADAR SENSOR ASSEMBLY (w/ Toyota Safety Sense) *3 BRAKE ACTUATOR ASSEMBLY *4 ECM ILLUSTRATION *1 4WD ECU ASSEMBLY - - ILLUSTRATION *1 COMBINATION METER ASSEMBLY *2 METER MIRROR SUB-ASSEMBLY (w/ Headup Display) *3 CENTRAL GATEWAY ECU (NETWORK GATEWAY ECU) *4 MAIN BODY ECU (MULTIPLEX NETWORK BODY ECU) *5 AIR CONDITIONING AMPLIFIER ASSEMBLY *6 AIRBAG SENSOR ASSEMBLY *7 POWER STEERING ECU ASSEMBLY *8 CERTIFICATION ECU (SMART KEY ECU ASSEMBLY) *9 STEERING SENSOR *10 ENGINE STOP AND START ECU *11 STEREO COMPONENT EQUALIZER ASSEMBLY (w/ Active Noise Control System) *12 POWER DISTRIBUTION BOX ASSEMBLY *13 DLC3 - - ILLUSTRATION *1 NO...
Categories
- Manuals Home
- Toyota Yaris Owners Manual
- Toyota Yaris Service Manual
- Key Battery Replacement
- Headlights
- Power Integration No.1 System Missing Message (B235287,B235587,B235787-B235987)
- New on site
- Most important about car
Front Seat Belt Pretensioners
The front seat belt pretensioners are designed to deploy in moderate or severe frontal, near frontal collisions.
In addition, the pretensioners operate when a side collision or a rollover accident is detected. The pretensioners operate differently depending on what types of air bags are equipped. For more details about the seat belt pretensioner operation, refer to the SRS Air Bag Deployment Criteria.