Toyota Yaris: Cylinder Head Gasket / Components
COMPONENTS
ILLUSTRATION
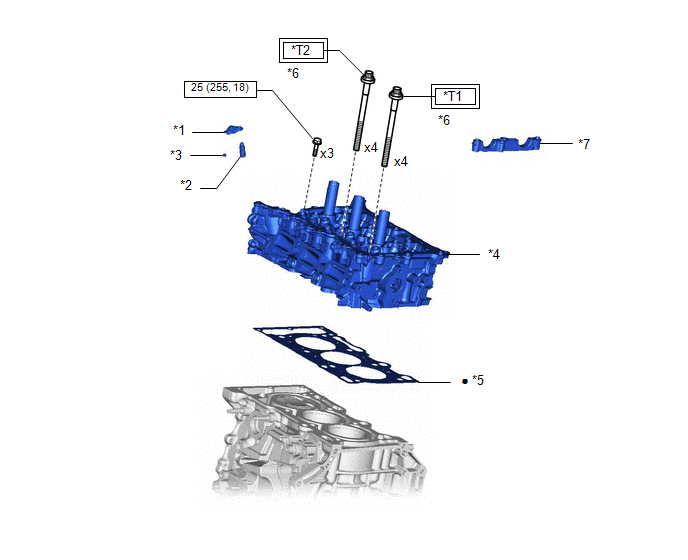
| *1 | NO. 1 VALVE ROCKER ARM SUB-ASSEMBLY | *2 | VALVE LASH ADJUSTER ASSEMBLY |
| *3 | VALVE STEM CAP | *4 | CYLINDER HEAD SUB-ASSEMBLY |
| *5 | CYLINDER HEAD GASKET | *6 | CYLINDER HEAD SET BOLT |
| *7 | NO. 1 CAMSHAFT BEARING CAP | - | - |
 | Tightening torque for "Major areas involving basic vehicle performance such as moving/turning/stopping" : N*m (kgf*cm, ft.*lbf) |
 | N*m (kgf*cm, ft.*lbf): Specified torque |
| ● | Non-reusable part | - | - |
| *T1 | 1st: 50 (510, 37) 2nd: Turn 90° 3rd: Turn 90° | *T2 | 1st: 40 (408, 30) 2nd: Turn 90° 3rd: Turn 90° |

 Removal
REMOVAL CAUTION / NOTICE / HINT The necessary procedures (adjustment, calibration, initialization, or registration) that must be performed after parts are removed and installed, or replaced during cylinder head gasket removal/installation are shown below...
Other information:
Toyota Yaris XP210 (2020-2026) Reapir and Service Manual: Zero Point Calibration of Steering Angle Sensor Malfunction (X20D7)
DESCRIPTION Code Tester Display Measurement Item Trouble Area RoB Output from X20D7 Zero Point Calibration of Steering Angle Sensor Malfunction History of the steering angle sensor zero point calibration position differing from the stored value Poor adjustment of the center position of the steering wheel Poor adjustment of wheel alignment Brake CAUTION / NOTICE / HINT NOTICE: After performing the inspection, check and clear the vehicle control history (RoB)...
Toyota Yaris XP210 (2020-2026) Reapir and Service Manual: Ea67f Manual Transaxle Oil
ComponentsCOMPONENTS ILLUSTRATION *1 NO. 1 ENGINE UNDER COVER ASSEMBLY *2 ENGINE UNDER COVER LH *3 MANUAL TRANSMISSION FILLER PLUG *4 MANUAL TRANSMISSION DRAIN PLUG *5 GASKET - - N*m (kgf*cm, ft.*lbf): Specified torque ● Non-reusable part ReplacementREPLACEMENT PROCEDURE 1...
Categories
- Manuals Home
- Toyota Yaris Owners Manual
- Toyota Yaris Service Manual
- Battery Monitor Module General Electrical Failure (P058A01)
- Removal
- How to use USB mode
- New on site
- Most important about car
Keys

To use the auxiliary key, press the knob and pull out the auxiliary key from the smart key.

Copyright © 2026 www.toyaris4.com