Toyota Yaris: Seat Belt / Child Restraint Seat Anchor Bracket
Components
COMPONENTS
ILLUSTRATION
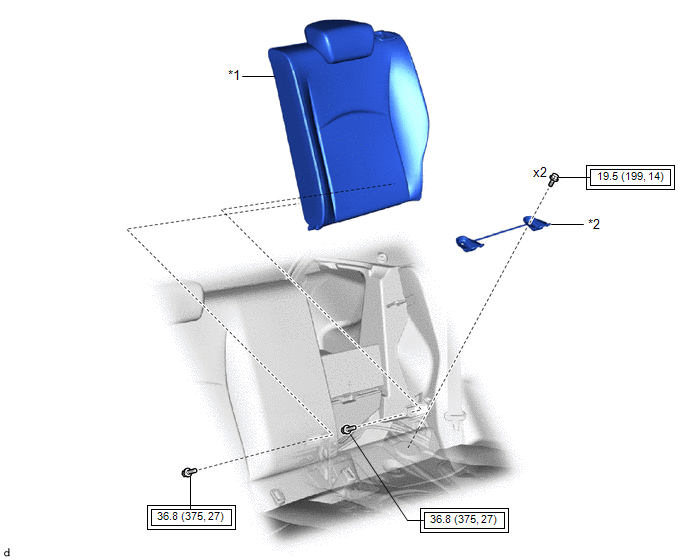
| *1 | REAR SEATBACK ASSEMBLY | *2 | CHILD RESTRAINT SEAT ANCHOR BRACKET SUB-ASSEMBLY |
 | Tightening torque for "Major areas involving basic vehicle performance such as moving/turning/stopping" : N*m (kgf*cm, ft.*lbf) | - | - |
Removal
REMOVAL
CAUTION / NOTICE / HINT
HINT:
- Use the same procedure for the RH side and LH side.
- The procedure listed below is for the LH side.
PROCEDURE
1. REMOVE REAR SEATBACK ASSEMBLY
Click here

2. REMOVE CHILD RESTRAINT SEAT ANCHOR BRACKET SUB-ASSEMBLY
| (a) Remove the 2 bolts and child restraint seat anchor bracket sub-assembly. |
|

Installation
INSTALLATION
CAUTION / NOTICE / HINT
HINT:
- Use the same procedure for the RH side and LH side.
- The procedure listed below is for the LH side.
PROCEDURE
1. INSTALL CHILD RESTRAINT SEAT ANCHOR BRACKET SUB-ASSEMBLY
| (a) Temporarily install the child restraint seat anchor bracket sub-assembly with the 2 bolts. |
|

(b) Tighten the 2 bolts in the order shown in the illustration.
Torque:
19.5 N·m {199 kgf·cm, 14 ft·lbf}
2. INSTALL REAR SEATBACK ASSEMBLY
Click here

 Seat Belt
..

Other information:
Toyota Yaris XP210 (2020-2026) Reapir and Service Manual: Control Module Processor Watchdog/Safety MCU Failure (P060647)
MONITOR DESCRIPTION The ECM continuously monitors its main CPU and monitor IC. This self-check ensures that the ECM is functioning properly. If outputs from main CPU and monitor IC are different and deviate from the standard, the ECM will illuminate the MIL and store this DTC...
Toyota Yaris XP210 (2020-2026) Owner's Manual: Emission Control System
This vehicle is equipped with an emission control system (the catalytic converter is part of this system) that enables the vehicle to comply with existing exhaust emissions requirements. Under U.S. federal law, any modification to the original-equipment emission control system before the first sale and registration of a vehicle is subject to penalties...
Categories
- Manuals Home
- Toyota Yaris Owners Manual
- Toyota Yaris Service Manual
- Engine & Hybrid System
- Key Battery Replacement
- Power Integration No.1 System Missing Message (B235287,B235587,B235787-B235987)
- New on site
- Most important about car
Refueling
Before refueling, close all the doors, windows, and the liftgate/trunk lid, and switch the ignition OFF.
To open the fuel-filler lid, pull the remote fuel-filler lid release.
