Toyota Yaris: Manual Transaxle Assembly / Removal
REMOVAL
CAUTION / NOTICE / HINT
The necessary procedures (adjustment, calibration, initialization, or registration) that must be performed after parts are removed and installed, or replaced during the manual transaxle assembly removal/installation are shown below.
Necessary Procedure After Parts Removed/Installed/Replaced| Replaced Part or Performed Procedure | Necessary Procedure | Effect/Inoperative Function when Necessary Procedure not Performed | Link |
|---|---|---|---|
| Front wheel alignment adjustment | ECU Data Initialization | Active torque split AWD system |
|
| Calibration |
|
|


HINT:
When the cable is disconnected / reconnected to the auxiliary battery terminal, systems temporarily stop operating. However, each system has a function that completes learning the first time the system is used.
-
Learning completes when vehicle is driven
Effect/Inoperative Function When Necessary Procedures are not Performed
Necessary Procedures
Link
Lane tracing assist system
Drive the vehicle straight ahead at 35 km/h (22 mph) or more for 5 second or more.

Pre-collision system
Stop and start system
Drive the vehicle until stop and start control is permitted (approximately 5 to 60 minutes)

-
Learning completes when vehicle is operated normally
Effect/Inoperative Function When Necessary Procedures are not Performed
Necessary Procedures
Link
Power door lock control system
- Back door opener
Perform door unlock operation with door control switch or electrical key transmitter sub-assembly switch.

Air conditioning system
After the ignition switch is turned to ON, the servo motor standard position is recognized.
-
PROCEDURE
1. REMOVE ENGINE ASSEMBLY WITH TRANSAXLE
Click here

2. REMOVE FLYWHEEL HOUSING SIDE COVER
Click here

3. REMOVE STARTER ASSEMBLY
Click here

4. DISCONNECT ENGINE WIRE
| (a) Disconnect the 4 connectors |
|
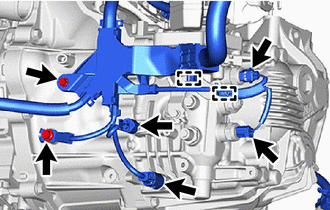
(b) Remove the 2 bolts and separate the engine wire from the manual transaxle assembly.
(c) Disengage the 2 clamps to separate the engine wire from the wire harness clamp bracket.
| (d) Disconnect the connector. |
|
(e) Remove the bolt and separate the engine wire from the wire harness clamp bracket.
(f) Disengage the 2 clamps to separate the engine wire from the wire harness clamp bracket.
| (g) Disengage the 4 clamps to separate the engine wire from the wire harness clamp bracket. |
|
5. REMOVE EXHAUST MANIFOLD CONVERTER SUB-ASSEMBLY
Click here

6. REMOVE TURBINE OUTLET ELBOW GASKET
Click here

7. REMOVE FRONT SUSPENSION CROSSMEMBER SUB-ASSEMBLY
| (a) Remove the bolt and front suspension crossmember sub-assembly from the No. 2 engine moving control rod. |
|
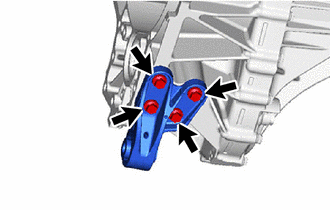
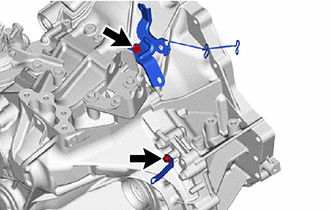
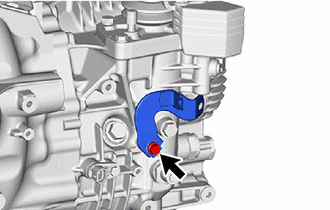
8. REMOVE NO. 2 ENGINE MOVING CONTROL ROD
| (a) Remove the 4 bolts and No. 2 engine moving control rod from the manual transaxle assembly. |
|
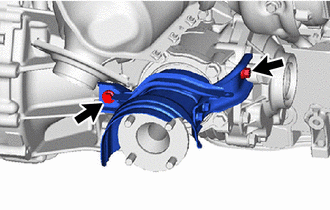
9. REMOVE PROPELLER SHAFT HEAT INSULATOR
| (a) Remove the 2 bolts and propeller shaft heat insulator from the manual transaxle assembly and transfer assembly. |
|
10. LOOSEN TRANSFER ASSEMBLY
| (a) Loosen the 2 bolts and 2 nuts. |
|
| (b) Loosen the 4 nuts. |
|

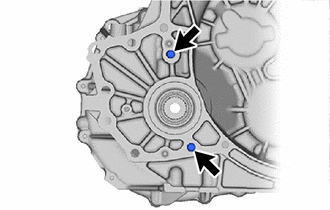
11. REMOVE MANUAL TRANSAXLE ASSEMBLY
| (a) Remove the bolt. |
|
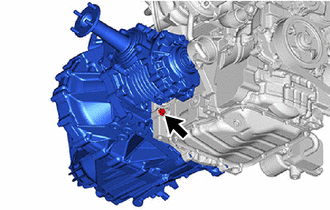
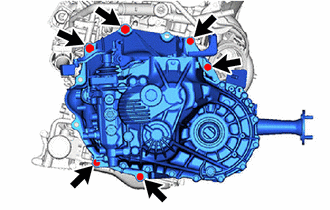
| (b) Remove the 6 bolts and manual transaxle assembly from the engine assembly. NOTICE: To prevent damage to the 2 knock pins, do not pry between the manual transaxle assembly and engine assembly. |
|
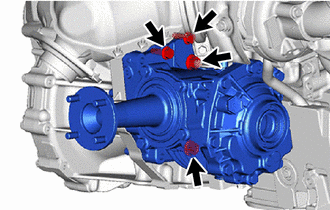
12. REMOVE TRANSFER ASSEMBLY
| (a) Remove the 2 bolts and 2 nuts. |
|

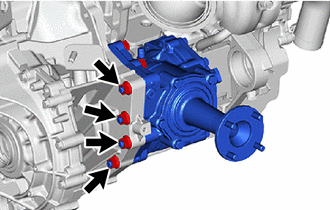
| (b) Remove the 4 nuts and transfer assembly from the manual transaxle assembly. |
|
13. REMOVE BLEEDER CLUTCH RELEASE TUBE
Click here

14. REMOVE CLUTCH RELEASE BLEEDER SUB-ASSEMBLY
Click here

15. REMOVE CLUTCH RELEASE BEARING PLATE
Click here

16. REMOVE CLUTCH RELEASE CYLINDER WITH BEARING ASSEMBLY
Click here

17. REMOVE CLUTCH RELEASE CYLINDER TO BLEEDER TUBE
Click here

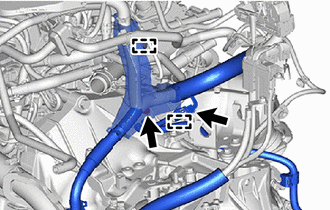
18. REMOVE CLUTCH FLEXIBLE HOSE BRACKET
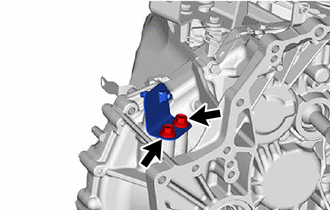
| (a) Remove the bolt and clutch flexible hose bracket from the manual transaxle assembly. |
|
19. REMOVE EXHAUST PIPE SUPPORT STAY
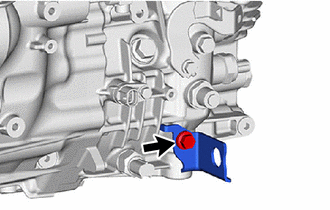
| (a) Remove the 2 bolts and exhaust pipe support stay from the manual transaxle assembly. |
|
20. REMOVE WIRE HARNESS CLAMP BRACKET
| (a) Remove the 2 bolts and 2 wire harness clamp brackets from the manual transaxle assembly. |
|
| (b) Remove the bolt and wire harness clamp bracket from the manual transaxle assembly. |
|
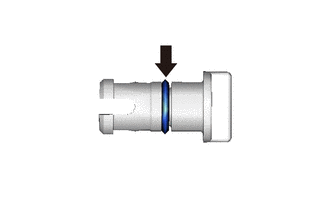
21. REMOVE MANUAL TRANSMISSION CASE PLUG
| (a) Remove the manual transmission case plug from the manual transaxle assembly. |
|
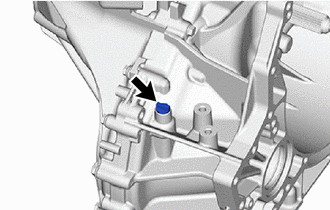
| (b) Remove the O-ring from the manual transmission case plug. |
|
22. REMOVE TRANSFER AND TRANSAXLE SETTING STUD BOLT
| (a) Remove the 2 transfer and transaxle setting stud bolts from the manual transaxle assembly. |
|
 Components
COMPONENTS ILLUSTRATION
*1 TURBINE OUTLET ELBOW GASKET *2 EXHAUST PIPE CLAMP *3 EXHAUST MANIFOLD CONVERTER SUB-ASSEMBLY *4 ENGINE WIRE *5 NO...
 Installation
INSTALLATION PROCEDURE 1. INSTALL TRANSFER AND TRANSAXLE SETTING STUD BOLT (a) Clean the bolt holes. (b) Apply adhesive 1324 to 2 or 3 threads on one half of a new transfer and transaxle setting stud bolt A as shown in the illustration...
Other information:
Toyota Yaris XP210 (2020-2026) Reapir and Service Manual: Brake System
PrecautionPRECAUTION NOTICE: This vehicle is equipped with an SRS (Supplemental Restraint System). Failure to carry out service operations in the correct sequence could cause the SRS to unexpectedly deploy during servicing. This may cause a serious accident...
Toyota Yaris XP210 (2020-2026) Reapir and Service Manual: Components
COMPONENTS ILLUSTRATION *1 CENTER LOWER INSTRUMENT COVER *2 SWITCH HOLE BASE SUB-ASSEMBLY *3 SHIFT LEVER KNOB SUB-ASSEMBLY *4 LOWER INSTRUMENT PANEL FINISH PANEL *5 FRONT DOOR SCUFF PLATE LH *6 COWL SIDE TRIM BOARD LH *7 FRONT DOOR OPENING TRIM WEATHERSTRIP LH *8 NO...
Categories
- Manuals Home
- Toyota Yaris Owners Manual
- Toyota Yaris Service Manual
- Opening and Closing the Liftgate/Trunk Lid
- Brake System Control Module "A" System Voltage System Voltage Low (C137BA2)
- Removal
- New on site
- Most important about car
Break-In Period
No special break-in is necessary, but a few precautions in the first 600 miles (1,000 km) may add to the performance, economy, and life of the vehicle.
Do not race the engine. Do not maintain one constant speed, either slow or fast, for a long period of time. Do not drive constantly at full-throttle or high engine rpm for extended periods of time. Avoid unnecessary hard stops. Avoid full-throttle starts.