Toyota Yaris: Wiper Switch / Removal
REMOVAL
PROCEDURE
1. REMOVE LOWER STEERING COLUMN COVER
NOTICE:
Removing the lower steering column cover in the incorrect order will cause the parts to break.
(a) Release the tilt and telescopic lever to fully extend and lower the steering column assembly.
(b) Lock the tilt and telescopic lever.
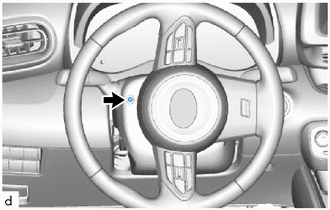
| (c) Turn the steering wheel assembly to the left to remove the screw. |
|
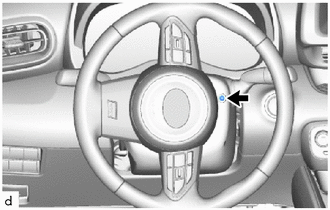
| (d) Turn the steering wheel assembly to the right to remove the screw. |
|
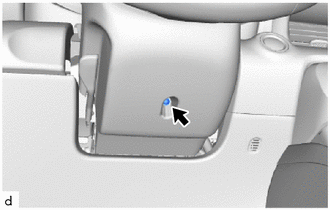
| (e) Remove the screw. |
|
(f) Disengage the claws to remove the lower steering column cover as shown in the illustration.
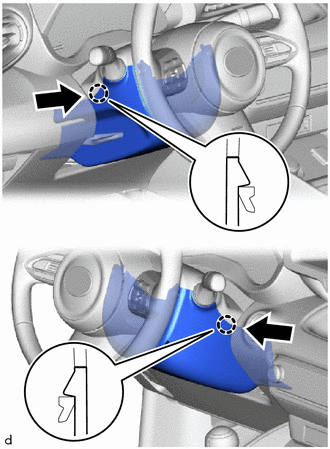
.png) | Push |
2. REMOVE UPPER STEERING COLUMN COVER
(a) Turn the steering wheel assembly to the straight.
| (b) Disengage the claw to remove the upper steering column cover. |
|

3. REMOVE WINDSHIELD WIPER SWITCH ASSEMBLY
(a) Turn the steering wheel assembly to the right.
(b) Using a screwdriver with its tip wrapped in protective tape, disengage the claw to remove the windshield wiper switch assembly as shown in the illustration.
NOTICE:
If the claw is pulled with excessive force, it may break.

| *a | Protective Tape |
.png) | Remove in this Direction |
 Components
C..
 Inspection
INSPECTION PROCEDURE 1. INSPECT WINDSHIELD WIPER SWITCH ASSEMBLY (a) Check the resistance. (1) Measure the resistance according to the value(s) in the table below...
Other information:
Toyota Yaris XP210 (2020-2026) Reapir and Service Manual: Components
COMPONENTS ILLUSTRATION *1 FRONT DISC BRAKE PIN HOLD CLIP *2 FRONT DISC BRAKE ANTI-RATTLE PIN *3 FRONT DISC BRAKE ANTI-RATTLE SPRING *4 FRONT DISC BRAKE PAD *5 FRONT DISC BRAKE ANTI-SQUEAL SHIM - - ILLUSTRATION *1 FRONT FLEXIBLE HOSE *2 UNION BOLT *3 GASKET *4 FRONT DISC BRAKE CYLINDER ASSEMBLY *5 FRONT DISC - - Tightening torque for "Major areas involving basic vehicle performance such as moving/turning/stopping": N*m (kgf*cm, ft...
Toyota Yaris XP210 (2020-2026) Reapir and Service Manual: Components
COMPONENTS ILLUSTRATION *1 REAR COIL SPRING *2 REAR LOWER COIL SPRING INSULATOR *3 REAR UPPER COIL SPRING INSULATOR *4 REAR NO. 2 SUSPENSION ARM ASSEMBLY *5 REAR SUSPENSION TOE ADJUST CAM SUB-ASSEMBLY *6 NO. 2 CAMBER ADJUST CAM *7 REAR STABILIZER LINK ASSEMBLY *8 REAR STABILIZER BAR *9 CAP - - Tightening torque for "Major areas involving basic vehicle performance such as moving/turning/stopping" : N*m (kgf*cm, ft...
Categories
- Manuals Home
- Toyota Yaris Owners Manual
- Toyota Yaris Service Manual
- Diagnostic Trouble Code Chart
- Maintenance
- Engine & Hybrid System
- New on site
- Most important about car
Turning the Engine Off
Stop the vehicle completely. Manual transaxle: Shift into neutral and set the parking brake.Automatic transaxle: Shift the selector lever to the P position and set the parking brake.
Press the push button start to turn off the engine. The ignition position is off.