Toyota Yaris: Rear Coil Spring / Removal
REMOVAL
CAUTION / NOTICE / HINT
The necessary procedures (adjustment, calibration, initialization, or registration) that must be performed after parts are removed and installed, or replaced during rear coil spring removal/installation are shown below.
Necessary Procedures After Parts Removed/Installed/Replaced| Replaced Part or Performed Procedure | Necessary Procedure | Effect/Inoperative Function when Necessary Procedure not Performed | Link |
|---|---|---|---|
| Rear wheel alignment adjustment | ECU Data Initialization | Active torque split AWD system |
|
| Calibration |
|
|


HINT:
- Use the same procedure for the RH side and LH side.
- The following procedure is for the LH side.
PROCEDURE
1. REMOVE REAR WHEEL
Click here

2. REMOVE REAR STABILIZER LINK ASSEMBLY
Click here

3. REMOVE REAR COIL SPRING
| (a) Place matchmarks on the No. 2 camber adjust cam, rear suspension toe adjust cam sub-assembly and rear suspension member sub-assembly. |
|
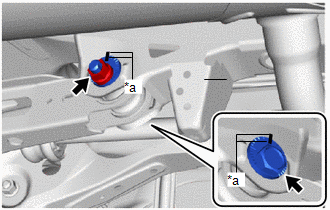
(b) Loosen the nut (rear suspension member sub-assembly side) of the rear No. 2 suspension arm assembly.
NOTICE:
Hold the rear suspension toe adjust cam sub-assembly while rotating the nut.
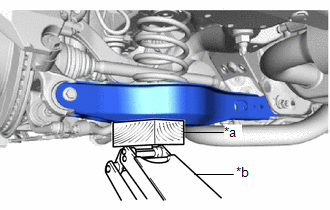
| (c) Using a jack and a wooden block, support the rear No. 2 suspension arm assembly. NOTICE:
|
|
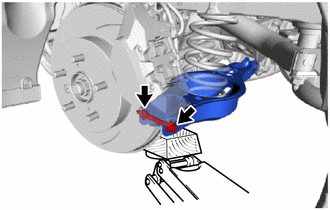
| (d) Remove the bolt and nut, and separate the rear No. 2 suspension arm assembly (rear axle carrier sub-assembly side) from the rear axle carrier sub-assembly. NOTICE: Loosen the bolt with the nut secured. |
|
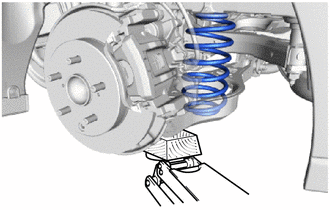
| (e) Slowly lower the rear No. 2 suspension arm assembly, and then remove the rear coil spring. |
|
4. REMOVE REAR UPPER COIL SPRING INSULATOR
(a) Remove the rear upper coil spring insulator from the vehicle body.
5. REMOVE REAR LOWER COIL SPRING INSULATOR
(a) Remove the rear lower coil spring insulator from the rear No. 2 suspension arm assembly.
 Components
COMPONENTS ILLUSTRATION
*1 REAR COIL SPRING *2 REAR LOWER COIL SPRING INSULATOR *3 REAR UPPER COIL SPRING INSULATOR *4 REAR NO. 2 SUSPENSION ARM ASSEMBLY *5 REAR SUSPENSION TOE ADJUST CAM SUB-ASSEMBLY *6 NO...
 Installation
INSTALLATION CAUTION / NOTICE / HINT HINT:
Use the same procedure for the RH side and LH side.
The following procedure is for the LH side.
PROCEDURE 1...
Other information:
Toyota Yaris XP210 (2020-2026) Reapir and Service Manual: Disassembly
DISASSEMBLY PROCEDURE 1. REMOVE MILLIMETER WAVE RADAR SENSOR ASSEMBLY (w/ Pre-collision System) Click here 2. REMOVE NO. 3 ENGINE ROOM WIRE (w/ Pre-collision System) (a) Disengage the clamps to remove the No. 3 engine room wire. 3. REMOVE FOG LIGHT ASSEMBLY LH Click here 4...
Toyota Yaris XP210 (2020-2026) Reapir and Service Manual: Terminals Of Ecu
TERMINALS OF ECU CHECK POWER DISTRIBUTION BOX ASSEMBLY AND MAIN BODY ECU (MULTIPLEX NETWORK BODY ECU) *1 Power Distribution Box Assembly *2 Main Body ECU (Multiplex Network Body ECU) (a) Remove the main body ECU (multiplex network body ECU) from the power distribution box assembly...
Categories
- Manuals Home
- Toyota Yaris Owners Manual
- Toyota Yaris Service Manual
- How to use USB mode
- To Set Speed
- How to connect USB port/Auxiliary jack
- New on site
- Most important about car
Liftgate/Trunk Lid
WARNING
Never allow a person to ride in the luggage compartment/trunk
Allowing a person to ride in the luggage compartment/trunk is dangerous. The person in the luggage compartment/trunk could be seriously injured or killed during sudden braking or a collision.
Do not drive with the liftgate/trunk lid open