Toyota Yaris: Rear Coil Spring / Components
COMPONENTS
ILLUSTRATION
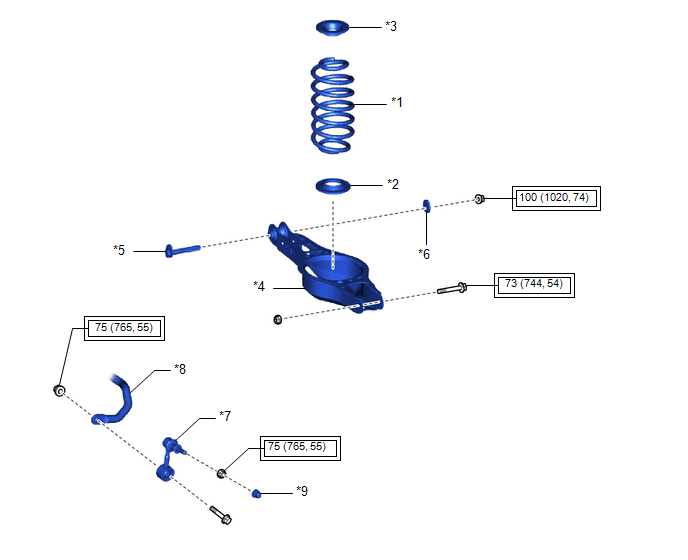
| *1 | REAR COIL SPRING | *2 | REAR LOWER COIL SPRING INSULATOR |
| *3 | REAR UPPER COIL SPRING INSULATOR | *4 | REAR NO. 2 SUSPENSION ARM ASSEMBLY |
| *5 | REAR SUSPENSION TOE ADJUST CAM SUB-ASSEMBLY | *6 | NO. 2 CAMBER ADJUST CAM |
| *7 | REAR STABILIZER LINK ASSEMBLY | *8 | REAR STABILIZER BAR |
| *9 | CAP | - | - |
 | Tightening torque for "Major areas involving basic vehicle performance such as moving/turning/stopping" : N*m (kgf*cm, ft.*lbf) | - | - |

 Removal
REMOVAL CAUTION / NOTICE / HINT The necessary procedures (adjustment, calibration, initialization, or registration) that must be performed after parts are removed and installed, or replaced during rear coil spring removal/installation are shown below...
Other information:
Toyota Yaris XP210 (2020-2026) Reapir and Service Manual: Starter Signal Circuit
DESCRIPTION The engine stop and start ECU uses its internal starter circuit to drive the starter drive relay (ST No. 1 relay) and operate the starter. WIRING DIAGRAM CAUTION / NOTICE / HINT When the engine stop and start ECU is replaced, read the number of starter operations before replacement and record this number to the new engine stop and start ECU after replacement...
Toyota Yaris XP210 (2020-2026) Owner's Manual: Rocking the Vehicle
If you must rock the vehicle to free it from snow, sand or mud, depress the accelerator slightly and slowly move the shift lever from 1 (D) to R position. WARNING Do not spin the wheels at more than 35 mph (56 km/h), and do not allow anyone to stand behind a wheel when pushing the vehicle When the vehicle is stuck, spinning the wheels at high speed is dangerous...
Categories
- Manuals Home
- Toyota Yaris Owners Manual
- Toyota Yaris Service Manual
- Engine Start Function When Key Battery is Dead
- Power Integration No.1 System Missing Message (B235287,B235587,B235787-B235987)
- How to use USB mode
- New on site
- Most important about car
Keys

To use the auxiliary key, press the knob and pull out the auxiliary key from the smart key.

Copyright © 2026 www.toyaris4.com