Toyota Yaris: Front Lower Ball Joint / Removal
REMOVAL
CAUTION / NOTICE / HINT
The necessary procedures (adjustment, calibration, initialization, or registration) that must be performed after parts are removed and installed, or replaced during front lower ball joint assembly removal/installation are shown below.
Necessary Procedures After Parts Removed/Installed/Replaced| Replacement Part or Procedure | Necessary Procedures | Effect/Inoperative Function When Necessary Procedures are not Performed | Link |
|---|---|---|---|
| Front wheel alignment adjustment | ECU Data Initialization | Active torque split AWD system |
|
| Calibration |
|
|


HINT:
- Use the same procedure for the RH and LH sides.
- The following procedure is for the LH side.
PROCEDURE
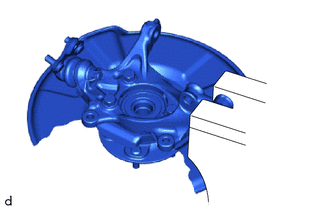
1. REMOVE FRONT AXLE ASSEMBLY
Click here

2. REMOVE FRONT LOWER BALL JOINT ASSEMBLY
| (a) Secure the front axle assembly in a vise using aluminum plates. NOTICE: Do not overtighten the vise. |
|
| (b) Remove the cotter pin. |
|
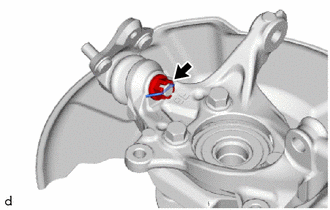
(c) Remove the nut.
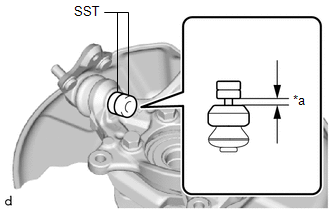
| (d) Install SST to the front lower ball joint assembly as shown in the illustration. SST: 09960-20010 09961-02050 NOTICE: Check that the clearance measurement between SST and the front axle assembly is 1 mm (0.0394 in.). |
|
(e) Using SST, remove the front lower ball joint assembly from the front axle assembly as shown in the illustration.
SST: 09960-20010
09961-02010
09961-02050
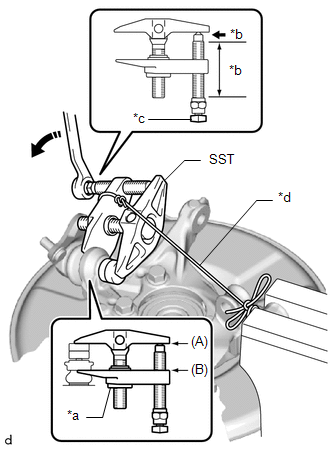
| *a | Center Nut |
| *b | Molybdenum Grease Application Area |
| *c | Place wrench here |
| *d | String |
 | Turn |
CAUTION:
Apply molybdenum grease to the threads and end of the SST bolt.
NOTICE:
- Install SST with the center nut so that (A) and (B) shown in the illustration are parallel. Otherwise, the front lower ball joint dust cover may be damaged.
- Be sure to place a wrench on the part shown in the illustration.
- Do not damage the front lower ball joint dust cover.
- Do not damage the steering knuckle.
- Do not damage the front disc brake dust cover.
 On-vehicle Inspection
ON-VEHICLE INSPECTION PROCEDURE 1. INSPECT FRONT LOWER BALL JOINT ASSEMBLY (a) Check for looseness. (1) Lift up the vehicle. (2) Move the front lower No...
 Inspection
INSPECTION PROCEDURE 1. INSPECT FRONT LOWER BALL JOINT ASSEMBLY (a) Inspect the turning torque of the ball joint. (1) Secure the front lower ball joint assembly in a vise using aluminum plates...
Other information:
Toyota Yaris XP210 (2020-2026) Reapir and Service Manual: Terminals Of Ecu
TERMINALS OF ECU NOTICE: DTCs may be output when connectors are disconnected during inspection. Therefore, be sure to clear the DTCs using the GTS once the inspection has been completed. Do not apply excessive force to the forward recognition camera connector...
Toyota Yaris XP210 (2020-2026) Reapir and Service Manual: Starter Relay Signal Compare Failure (P061562)
DESCRIPTION When the STA signal detected by the ECM and by the engine stop and start ECU do not match, the engine stop and start ECU stores DTC P061562 and blinks the stop and start cancel indicator. DTC No. Detection Item DTC Detection Condition Trouble Area Warning Indicate Memory Note P061562 Starter Relay Signal Compare Failure Both of the following conditions are met for 2 seconds or more (1 trip detection logic): Normal communication with the ECM...
Categories
- Manuals Home
- Toyota Yaris Owners Manual
- Toyota Yaris Service Manual
- How to use USB mode
- Removal
- Brake System Control Module "A" System Voltage System Voltage Low (C137BA2)
- New on site
- Most important about car
Front Seat Belt Pretensioners
The front seat belt pretensioners are designed to deploy in moderate or severe frontal, near frontal collisions.
In addition, the pretensioners operate when a side collision or a rollover accident is detected. The pretensioners operate differently depending on what types of air bags are equipped. For more details about the seat belt pretensioner operation, refer to the SRS Air Bag Deployment Criteria.