Toyota Yaris: Front Lower Ball Joint / Inspection
INSPECTION
PROCEDURE
1. INSPECT FRONT LOWER BALL JOINT ASSEMBLY
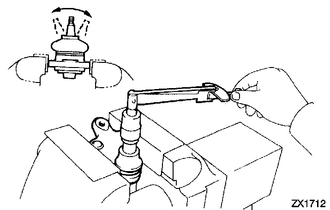
| (a) Inspect the turning torque of the ball joint. (1) Secure the front lower ball joint assembly in a vise using aluminum plates. (2) Install the nut to the front lower ball joint assembly stud. (3) Using a torque wrench, turn the stud continuously at a rate of 3 to 5 seconds per turn and take the torque reading on the 5th turn. Turning Torque: 0.98 to 4.9 N*m (10 to 49 kgf*cm, 9 to 43 in.*lbf) HINT: If the turning torque is not within the specified range, replace the front lower ball joint assembly with a new one. (4) Turn the stud to check that the stud does not catch and there is no play. HINT: If the stud catches or there is play while turning, replace the front lower ball joint assembly with a new one. |
|
(b) Inspect the dust cover.
(1) Check that the dust cover is not cracked and that there is no grease on it.
HINT:
If the dust cover is cracked or there is grease on it, replace the front lower ball joint assembly with a new one.
 Removal
REMOVAL CAUTION / NOTICE / HINT The necessary procedures (adjustment, calibration, initialization, or registration) that must be performed after parts are removed and installed, or replaced during front lower ball joint assembly removal/installation are shown below...
 Installation
INSTALLATION CAUTION / NOTICE / HINT HINT:
Use the same procedure for the RH side and LH side.
The following procedure is for the LH side.
PROCEDURE 1...
Other information:
Toyota Yaris XP210 (2020-2026) Reapir and Service Manual: Diagnostic Trouble Code Chart
D..
Toyota Yaris XP210 (2020-2026) Owner's Manual: Add-On Non-Genuine Parts and Accessories
Non-genuine parts and accessories for Toyota vehicles can be found in stores. These may fit your vehicle, but they are not approved by Toyota for use with Toyota vehicles. When you install non-genuine parts or accessories, they could affect your vehicle’s performance or safety systems; the Toyota warranty doesn’t cover this...
Categories
- Manuals Home
- Toyota Yaris Owners Manual
- Toyota Yaris Service Manual
- Opening and Closing the Liftgate/Trunk Lid
- How to use USB mode
- Adjustment
- New on site
- Most important about car
Keys

To use the auxiliary key, press the knob and pull out the auxiliary key from the smart key.
