
Toyota Yaris: Active Noise Control System / Precaution
PRECAUTION
PRECAUTION FOR ACTIVE NOISE CONTROL SYSTEM
(a) If the active noise control microphone garnish hole is blocked, clean away the blockage and perform diagnosis.
(b) If heavy objects are loaded onto the rear package tray, remove them before performing diagnosis.

 Parts Location
PARTS LOCATION ILLUSTRATION
*1 ECM *2 NO. 1 ENGINE ROOM RELAY BLOCK - ECU-IGP NO. 3 FUSE ILLUSTRATION
*1 STEREO COMPONENT EQUALIZER ASSEMBLY *2 DLC3 ILLUSTRATION
*1 ACTIVE NOISE CONTROL MICROPHONE LH *2 ACTIVE NOISE CONTROL MICROPHONE RH *3 FRONT NO...
Other information:
Toyota Yaris XP210 (2020-2026) Owner's Manual: Floor Mat
Use only floor mats designed specifically for vehicles of the same model and model year as your vehicle. When setting a floor mat, position the floor mat so that its grommets are inserted over the pointed end of the retention posts. WARNING Make sure the floor mats are hooked on the retention pins to prevent them from bunching up under the foot pedals Using a floor mat that is not secured is dangerous as it will interfere with the accelerator and brake pedal operation, which could result in an accident...
Toyota Yaris XP210 (2020-2026) Reapir and Service Manual: Inspection
INSPECTION PROCEDURE 1. INSPECT FOG LIGHT ASSEMBLY LH (a) Check that the fog light assembly LH. (1) Apply auxiliary battery voltage to the fog light assembly LH and check that the light comes on. OK: Condition Specified Condition A104-2 (B) - Auxiliary battery positive (+) A104-1 (E) - Auxiliary battery negative (-) Fog light assembly LH comes on If the result is not as specified, replace the fog light assembly LH...
Categories
- Manuals Home
- Toyota Yaris Owners Manual
- Toyota Yaris Service Manual
- Engine & Hybrid System
- Power Integration No.1 System Missing Message (B235287,B235587,B235787-B235987)
- How to connect USB port/Auxiliary jack
- New on site
- Most important about car
Refueling
Before refueling, close all the doors, windows, and the liftgate/trunk lid, and switch the ignition OFF.
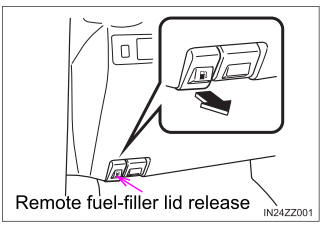
To open the fuel-filler lid, pull the remote fuel-filler lid release.

Copyright © 2026 www.toyaris4.com