Toyota Yaris: General Maintenance / Outside Vehicle
OUTSIDE VEHICLE
-
These are maintenance and inspection items that are considered to be the owner's responsibility.
The owner can do them or they can have them done at a service center.
These items include those that should be checked on a daily basis, those that in most cases do not require special tools, and those that are considered to be reasonable for the owner to do.
General maintenance items and procedures are as follows:
GENERAL NOTES
- Maintenance requirements vary depending on country.
- Check the maintenance schedule in the owner's manual.
- Following the maintenance schedule is mandatory.
- Determine the appropriate time to service the vehicle using either miles driven or time (months) elapsed, whichever reaches the specification first.
- Failing to check each vehicle part could lead to poor engine performance and increased exhaust emissions.
TIRES
(a) Check the tire inflation pressure with a gauge. Make adjustments if necessary.
(b) Check the surfaces of the tires for cuts, damage or excessive wear.
WHEEL NUTS
(a) Check for nuts that are loose or missing. Tighten them if necessary.
TIRE ROTATION
(a) Check the maintenance schedule in the owner's manual.
WINDSHIELD WIPER BLADES
(a) Check the blades for wear or cracks whenever they are unable to wipe the windshield clean. Replace them if necessary.
FLUID LEAKS
(a) Check under the vehicle for leaking fuel, oil, water and other fluids.
NOTICE:
If you smell fuel or notice any leaks, locate the cause and correct it.
DOORS AND ENGINE HOOD
(a) Check that all of the doors and the hood operate smoothly, and that all of the latches lock securely.
(b) When the primary latch is released, check that the engine hood secondary latch prevents the hood from opening.

 Inside Vehicle
INSIDE VEHICLE
These are maintenance and inspection items that are considered to be the owner's responsibility.
The owner can do them or they can have them done at a service center...
Other information:
Toyota Yaris XP210 (2020-2026) Reapir and Service Manual: Zero Point Calibration of Steering Angle Sensor Not Acquired (X20D8)
DESCRIPTION Code Tester Display Measurement Item Trouble Area RoB Output from X20D8 Zero Point Calibration of Steering Angle Sensor Not Acquired History of being unable to obtain the steering angle zero point Sensor installation Yaw rate and acceleration sensor (airbag sensor assembly) Brake CAUTION / NOTICE / HINT NOTICE: This Vehicle Control History (RoB) may be output during situations when the steering angle sensor zero point calibration temporarily cannot be acquired, such as when the stop light is stuck ON...
Toyota Yaris XP210 (2020-2026) Reapir and Service Manual: Installation
INSTALLATION CAUTION / NOTICE / HINT PROCEDURE 1. INSTALL BLOWER ASSEMBLY (a) Engage the claws to install the blower assembly. (b) Install the 3 screws. (c) Connect the connector. 2. INSTALL AIR CONDITIONER UNIT ASSEMBLY Click here 3...
Categories
- Manuals Home
- Toyota Yaris Owners Manual
- Toyota Yaris Service Manual
- Headlights
- Adjustment
- Maintenance
- New on site
- Most important about car
Refueling
Before refueling, close all the doors, windows, and the liftgate/trunk lid, and switch the ignition OFF.
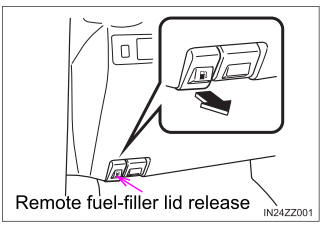
To open the fuel-filler lid, pull the remote fuel-filler lid release.