Toyota Yaris: Front Drive Shaft Assembly / Installation
INSTALLATION
CAUTION / NOTICE / HINT
HINT:
- Use the same procedure for the RH side and LH side.
- The following procedure is for the LH side.
PROCEDURE
1. INSTALL FRONT DRIVE SHAFT HOLE SNAP RING LH
(a) Install a new front drive shaft hole snap ring LH to the front drive shaft assembly LH.
2. INSTALL DRIVE SHAFT BEARING BRACKET HOLE SNAP RING
(a) Install a new drive shaft bearing bracket hole snap ring to the front drive shaft assembly RH.
3. INSTALL FRONT DRIVE SHAFT ASSEMBLY LH
(a) Coat the snap ring of the front drive inboard joint assembly with MP grease.
(b) Coat the splines of the front drive inboard joint assembly with Toyota genuine manual transmission gear oil LV.
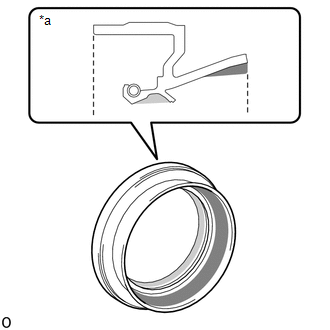
| *a | Cross Section of Front Drive Shaft Oil Seal LH |
 | MP Grease |
 | Toyota Genuine Oil Seal Side Lip Grease |
(c) Coat the lip of the front drive shaft oil seal LH with MP grease and Toyota genuine oil seal side lip grease as shown in the illustration.
HINT:
Apply a light coat of MP grease and Toyota genuine oil seal side lip grease to the entire circumference of the front drive shaft oil seal LH.
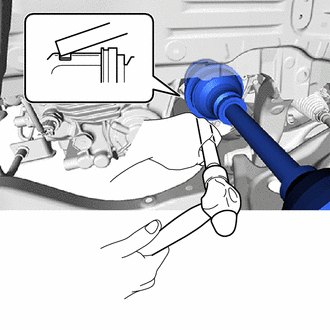
| (d) Align the inboard joint splines, and using a brass bar and a hammer, install the front drive shaft assembly LH. NOTICE:
HINT: Confirm whether the drive shaft is securely driven in by checking the reaction force and sound. |
|
4. INSTALL FRONT DRIVE SHAFT ASSEMBLY RH
(a) Coat the splines of the front drive inboard joint assembly with Toyota genuine manual transmission gear oil LV.
(b) Coat the lip of the transfer case oil seal RH with MP grease.
HINT:
Apply a light coat of MP grease to the entire circumference of the transfer case oil seal RH.
(c) Align the inboard joint splines and install the front drive shaft assembly RH.
NOTICE:
- Do not damage the transfer case oil seal RH.
- Do not damage the front drive shaft oil seal RH.
(d) Install the drive shaft bearing bracket hole snap ring to the drive shaft bearing bracket.
(e) Install a new bolt.
Torque:
32.4 N·m {330 kgf·cm, 24 ft·lbf}
5. INSTALL FRONT DRIVE SHAFT ASSEMBLY
(a) Apply 0.1 to 0.3 g (0.00353 to 0.0105 oz.) of Toyota body grease W to each of the 4 areas shown in the illustration.
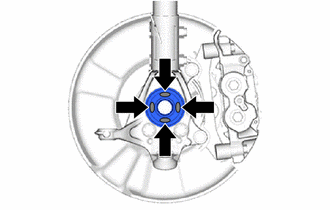
 | Toyota Body Grease W |
| (b) Align the matchmarks and install the front drive shaft assembly to the front axle assembly. NOTICE:
|
|
6. CONNECT FRONT LOWER NO.1 SUSPENSION ARM SUB-ASSEMBLY
Click here

7. INSTALL FRONT STABILIZER LINK ASSEMBLY
Click here

8. CONNECT TIE ROD END SUB-ASSEMBLY
Click here

9. INSTALL FRONT SPEED SENSOR
Click here

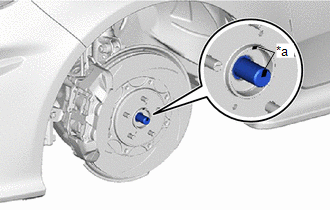
10. INSTALL FRONT AXLE SHAFT NUT
(a) Clean the threaded parts on the front drive shaft assembly and a new front axle shaft nut using non-residue solvent.
NOTICE:
- Be sure to perform this work even when using a new front drive shaft assembly.
- Keep the threaded parts free of oil and foreign matter.
(b) Using a 30 mm deep socket wrench, install the front axle shaft nut while applying the brakes.
Torque:
294 N·m {2998 kgf·cm, 217 ft·lbf}
| (c) Using a chisel and a hammer, stake the front axle shaft nut. |
|

11. ADD MANUAL TRANSAXLE OIL
Click here

12. ADD TRANSFER OIL
Click here

13. INSPECT FOR MANUAL TRANSAXLE OIL LEAK
14. INSPECT FOR TRANSFER OIL LEAK
15. INSTALL ENGINE UNDER COVER LH
Click here

16. INSTALL ENGINE UNDER COVER RH
HINT:
Use the same procedure as for the LH side.
17. INSTALL NO. 1 ENGINE UNDER COVER ASSEMBLY
Click here

18. INSTALL FRONT WHEEL
Click here

19. INSPECT AND ADJUST FRONT WHEEL ALIGNMENT
Click here

20. CHECK FOR SPEED SENSOR SIGNAL
Click here

 Reassembly
REASSEMBLY CAUTION / NOTICE / HINT NOTICE:
When using a vise, place aluminum plates between the part and vise.
When using a vise, do not overtighten it...

Other information:
Toyota Yaris XP210 (2020-2026) Reapir and Service Manual: How To Proceed With Troubleshooting
CAUTION / NOTICE / HINT HINT: *: Use the GTS. PROCEDURE 1. VEHICLE BROUGHT TO WORKSHOP NEXT 2. CUSTOMER PROBLEM ANALYSIS NEXT 3. CONNECT GTS TO DLC3* HINT: If the display indicates a communication malfunction, inspect the DLC3...
Toyota Yaris XP210 (2020-2026) Owner's Manual: Limitations to front/near front collision detection
T..
Categories
- Manuals Home
- Toyota Yaris Owners Manual
- Toyota Yaris Service Manual
- Power Integration No.1 System Missing Message (B235287,B235587,B235787-B235987)
- Immobilizer System
- Removal
- New on site
- Most important about car
Key Suspend Function
If a key is left in the vehicle, the functions of the key left in the vehicle are temporarily suspended to prevent theft of the vehicle.
To restore the functions, press the unlock button on the functions-suspended key in the vehicle.