Toyota Yaris: Active Noise Control Ecu / Installation
INSTALLATION
PROCEDURE
1. INSTALL NO. 2 EQUALIZER STEREO COMPONENT BRACKET
| (a) Engage the guides to install the No. 2 equalizer stereo component bracket. |
|
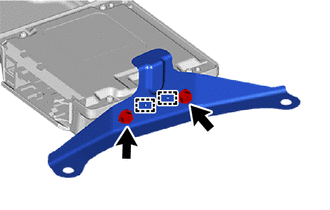
(b) Install the 2 bolts.
Torque:
4.5 N·m {46 kgf·cm, 40 in·lbf}
2. INSTALL NO. 1 EQUALIZER STEREO COMPONENT BRACKET
| (a) Engage the guides to install the No. 1 equalizer stereo component bracket. |
|
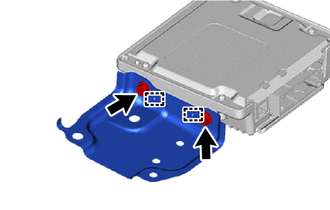
(b) Install the 2 bolts.
Torque:
4.5 N·m {46 kgf·cm, 40 in·lbf}
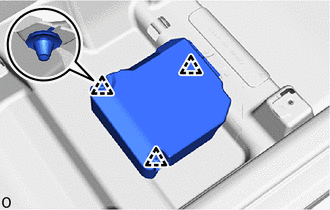
3. INSTALL STEREO COMPONENT EQUALIZER ASSEMBLY WITH BRACKET
| (a) Engage the guide to install the stereo component equalizer assembly with bracket. |
|
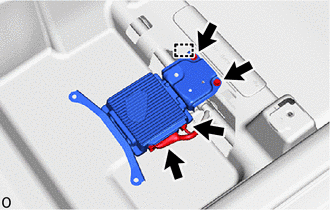
(b) Connect the 2 connectors.
(c) Install the 2 bolts.
Torque:
10 N·m {102 kgf·cm, 7 ft·lbf}
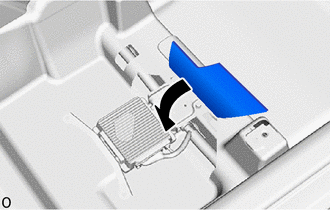
| (d) Return the front floor carpet assembly to its original position as shown in the illustration. |
|
4. INSTALL EQUALIZER STEREO COMPONENT COVER
| (a) Engage the clips to install the equalizer stereo component cover. |
|
5. INSTALL FRONT SEAT ASSEMBLY RH
Click here

 Removal
REMOVAL CAUTION / NOTICE / HINT HINT: When the cable is disconnected / reconnected to the auxiliary battery terminal, systems temporarily stop operating...
 Active Noise Control Microphone
ComponentsCOMPONENTS ILLUSTRATION
*1 ACTIVE NOISE CONTROL MICROPHONE - - RemovalREMOVAL CAUTION / NOTICE / HINT HINT:
When the cable is disconnected / reconnected to the auxiliary battery terminal, systems temporarily stop operating...
Other information:
Toyota Yaris XP210 (2020-2026) Reapir and Service Manual: Freeze Frame Data
FREEZE FRAME DATA CHECK FREEZE FRAME DATA HINT: Whenever an active noise control system DTC is stored, the stereo component equalizer assembly stores the current vehicle state as freeze frame data. (a) Enter the following menus: Body Electrical / Active Noise Control / Trouble Codes...
Toyota Yaris XP210 (2020-2026) Reapir and Service Manual: Reassembly
REASSEMBLY CAUTION / NOTICE / HINT NOTICE: Steps 9 to 16 are temporary reassembly procedures for adjustment purposes. PROCEDURE 1. INSTALL TRANSFER RING GEAR MOUNTING CASE (a) Using SST and a press, press the transfer ring gear mounting case into the transfer ring gear...
Categories
- Manuals Home
- Toyota Yaris Owners Manual
- Toyota Yaris Service Manual
- Fuse Panel Description
- G16e-gts (engine Mechanical)
- To Set Speed
- New on site
- Most important about car
Front Seat Belt Pretensioners
The front seat belt pretensioners are designed to deploy in moderate or severe frontal, near frontal collisions.
In addition, the pretensioners operate when a side collision or a rollover accident is detected. The pretensioners operate differently depending on what types of air bags are equipped. For more details about the seat belt pretensioner operation, refer to the SRS Air Bag Deployment Criteria.