Toyota Yaris: Condenser / Installation
INSTALLATION
PROCEDURE
1. INSTALL COOLER CONDENSER ASSEMBLY
| (a) Engage the guide to install the cooler condenser assembly. NOTICE: Do not damage the cooler condenser assembly or radiator assembly when installing the cooler condenser assembly. HINT: If a new cooler condenser assembly is installed, add compressor oil to the cooler condenser assembly as follows. Capacity: Add 40 cc (1.35 fl. oz) Compressor Oil: ND-OIL 8 or equivalent |
|
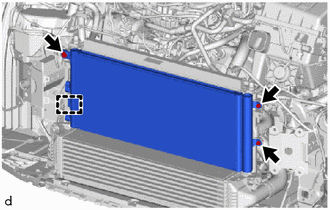
(b) Install the 3 bolts.
2. INSTALL NO. 2 AIR CONDITIONING TUBE AND ACCESSORY ASSEMBLY
(a) Remove the vinyl tape from the No. 2 air conditioner tube and accessory assembly and cooler condenser assembly.
(b) Sufficiently apply compressor oil to a new O-ring and the fitting surface of the No. 2 air conditioner tube and accessory assembly.
Compressor Oil:
ND-OIL 8 or equivalent
(c) Install the O-ring to the No. 2 air conditioner tube and accessory assembly.
NOTICE:
Keep the O-rings and O-ring fitting surfaces free from foreign matter.
(d) Connect the No. 2 air conditioner tube and accessory assembly to the cooler condenser assembly with the bolt.
Torque:
5.5 N·m {56 kgf·cm, 49 in·lbf}
3. INSTALL NO. 1 COOLER REFRIGERANT DISCHARGE HOSE
(a) Remove the vinyl tape from the No. 1 cooler refrigerant discharge hose and cooler condenser assembly.
(b) Sufficiently apply compressor oil to a new O-ring and the fitting surface of the No. 1 cooler refrigerant discharge hose.
Compressor Oil:
ND-OIL 8 or equivalent
(c) Install the O-ring to the No. 1 cooler refrigerant discharge hose.
NOTICE:
Keep the O-rings and O-ring fitting surfaces free from foreign matter.
(d) Connect the No. 1 cooler refrigerant discharge hose to the cooler condenser assembly with the bolt.
Torque:
5.5 N·m {56 kgf·cm, 49 in·lbf}
4. INSTALL NO. 1 RADIATOR AIR GUIDE LH
Click here

5. INSTALL NO. 1 RADIATOR AIR GUIDE RH
Click here

6. INSTALL FRONT RADIATOR SIDE AIR GUIDE PLATE LH
Click here

7. INSTALL FRONT RADIATOR SIDE AIR GUIDE PLATE RH
HINT:
Use the same procedure as for the LH side.
8. INSTALL COOL AIR INTAKE DUCT
Click here

9. INSTALL UPPER RADIATOR SUPPORT SUB-ASSEMBLY
Click here

10. INSTALL HOOD LOCK ASSEMBLY
Click here

11. INSTALL FRONT BUMPER REINFORCEMENT
Click here

12. INSTALL FRONT BUMPER ENERGY ABSORBER
Click here

13. INSTALL RADIATOR UPPER AIR GUIDE PLATE
Click here

14. INSTALL NO. 1 AIR CLEANER INLET
Click here

15. INSTALL HEADLIGHT ASSEMBLY LH
Click here

16. INSTALL HEADLIGHT ASSEMBLY RH
HINT:
Use the same procedure as for the LH side.
17. CHARGE AIR CONDITIONING SYSTEM WITH REFRIGERANT
Click here

18. WARM UP ENGINE
Click here

19. INSPECT FOR REFRIGERANT LEAK
Click here

 Reassembly
REASSEMBLY PROCEDURE 1. INSTALL COOLER DRYER (a) Using pliers, install a new cooler dryer to the modulator.
*a Modulator (b) Sufficiently apply compressor oil to the 3 O-rings and fitting surfaces of a new cap...
 Front Blower Motor
ComponentsCOMPONENTS ILLUSTRATION
*1 NO. 2 INSTRUMENT PANEL UNDER COVER SUB-ASSEMBLY *2 BLOWER MOTOR WITH FAN SUB-ASSEMBLY RemovalREMOVAL PROCEDURE 1...
Other information:
Toyota Yaris XP210 (2020-2026) Reapir and Service Manual: Lost Communication with Battery Monitor Module Missing Message (P162B87)
DESCRIPTION The ECM and battery state sensor assembly each detect reception malfunctions. A battery state sensor assembly reception malfunction detected by the battery state sensor assembly is sent to the ECM via LIN communication. If there is a malfunction in either the ECM or battery state sensor assembly, the ECM determines that there is a LIN communication malfunction and outputs a DTC...
Toyota Yaris XP210 (2020-2026) Reapir and Service Manual: Camshaft Position Sensor "A" Bank 1 or Single Sensor Circuit Short to Ground (P034011,P034015)
DESCRIPTION The camshaft position sensor (for intake camshaft) (VV1 signal) consists of a magnet and MRE (Magneto-Resistive Element). The intake camshaft has a timing rotor for the camshaft position sensor. When the intake camshaft rotates, changes occur in the air gaps between the timing rotor and MRE, which affects the magnetic field...
Categories
- Manuals Home
- Toyota Yaris Owners Manual
- Toyota Yaris Service Manual
- Fuel Gauge
- Key Battery Replacement
- Engine Start Function When Key Battery is Dead
- New on site
- Most important about car
Turning the Engine Off
Stop the vehicle completely. Manual transaxle: Shift into neutral and set the parking brake.Automatic transaxle: Shift the selector lever to the P position and set the parking brake.
Press the push button start to turn off the engine. The ignition position is off.