Toyota Yaris: Compressor / Installation
INSTALLATION
PROCEDURE
1. INSPECT COMPRESSOR OIL
(a) Remove the suction seal cap.
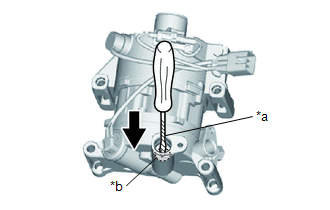
| (b) Using a screwdriver with its tip wrapped in protective tape, insert the screwdriver through the suction port and set the VST valve (valve inside suction port) to the open position. NOTICE: Be sure not to damage the piping contact surfaces with the tip of the screwdriver. |
|
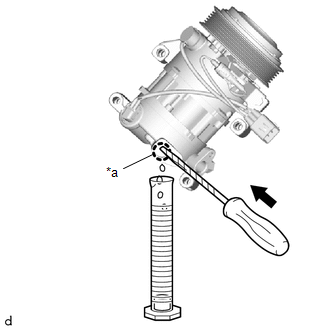
| (c) Lightly shake the compressor with pulley assembly with the suction port facing down, and drain the oil (*1). NOTICE: Do not allow the pulley to come into contact with the compressor oil. |
|
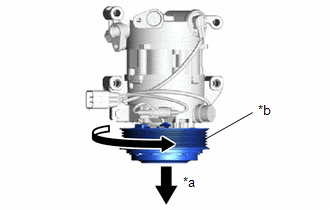
| (d) With the pulley facing down, rotate the pulley in the direction shown by the arrow 10 times at a rate of approximately once every 2 seconds (*2). NOTICE: If the pulley is rotated, refrigerant or oil might splash out. Thus, keep your face away from the compressor port. |
|
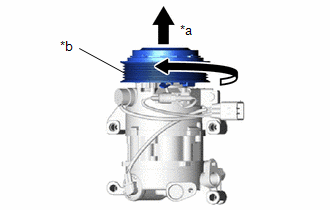
| (e) Rotate the pulley once in the direction shown by the arrow while quickly turning the compressor so the pulley is up (*3). |
|
(f) Proceed with the above procedure (*1) and drain the oil (*4).
(g) Drain the oil by repeating the procedures above approximately 5 times (from (*2) to (*4)).
Standard (Amount of Oil to be Removed):
| Standard (Amount of Oil to be Removed) | Amount of Oil Inside a New Compressor |
|---|---|
| 30 cm3 | 60 cm3 |
HINT:
If too much oil has been removed, set the VST valve to the open position through the suction port, and add oil.
2. INSTALL COMPRESSOR WITH PULLEY ASSEMBLY
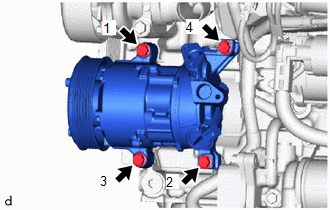
(a) Temporarily install the compressor with pulley assembly with the 4 bolts.
| (b) Tighten the 4 bolts and install the compressor with pulley assembly in the order shown in the illustration. Torque: 25 N·m {255 kgf·cm, 18 ft·lbf} |
|
(c) Connect the connector.
3. CONNECT NO. 1 COOLER REFRIGERANT DISCHARGE HOSE
(a) Remove the vinyl tape from the No. 1 cooler refrigerant discharge hose.
(b) Sufficiently apply compressor oil to a new O-ring and the fitting surface of the compressor with pulley assembly.
Compressor Oil:
ND-OIL 8 or equivalent
(c) Install the O-ring to the No. 1 cooler refrigerant discharge hose.
NOTICE:
Keep the O-ring and O-ring fitting surface free of foreign matter.
(d) Connect the No. 1 cooler refrigerant discharge hose to the compressor with pulley assembly with the bolt.
Torque:
9.5 N·m {97 kgf·cm, 84 in·lbf}
4. CONNECT SUCTION HOSE SUB-ASSEMBLY
(a) Remove the vinyl tape from the suction hose sub-assembly.
(b) Sufficiently apply compressor oil to a new O-ring and the fitting surface of the compressor with pulley assembly.
Compressor Oil:
ND-OIL 8 or equivalent
(c) Install the O-ring to the suction hose sub-assembly.
NOTICE:
Keep the O-ring and O-ring fitting surface free of foreign matter.
(d) Connect the suction hose sub-assembly to the compressor with pulley assembly with the bolt.
Torque:
9.5 N·m {97 kgf·cm, 84 in·lbf}
5. INSTALL FAN AND GENERATOR V BELT
Click here

6. INSTALL NO. 1 ENGINE UNDER COVER ASSEMBLY
Click here

7. CHARGE AIR CONDITIONING SYSTEM WITH REFRIGERANT
Click here

8. WARM UP ENGINE
Click here

9. INSPECT FOR REFRIGERANT LEAK
Click here

 Removal
REMOVAL PROCEDURE 1. RECOVER REFRIGERANT FROM REFRIGERATION SYSTEM Click here
2. REMOVE NO. 1 ENGINE UNDER COVER ASSEMBLY Click here
3. REMOVE FAN AND GENERATOR V BELT Click here
4...
 Condenser
..
Other information:
Toyota Yaris XP210 (2020-2026) Reapir and Service Manual: Terminals Of Ecu
TERMINALS OF ECU CHECK MAIN BODY ECU (MULTIPLEX NETWORK BODY ECU) AND POWER DISTRIBUTION BOX ASSEMBLY *1 Power Distribution Box Assembly *2 Main Body ECU (Multiplex Network Body ECU) (a) Remove the main body ECU (multiplex network body ECU) from the power distribution box assembly...
Toyota Yaris XP210 (2020-2026) Reapir and Service Manual: Parts Location
P..
Categories
- Manuals Home
- Toyota Yaris Owners Manual
- Toyota Yaris Service Manual
- Adjustment
- Opening and Closing the Liftgate/Trunk Lid
- Diagnostic Trouble Code Chart
- New on site
- Most important about car
Liftgate/Trunk Lid
WARNING
Never allow a person to ride in the luggage compartment/trunk
Allowing a person to ride in the luggage compartment/trunk is dangerous. The person in the luggage compartment/trunk could be seriously injured or killed during sudden braking or a collision.
Do not drive with the liftgate/trunk lid open