Toyota Yaris: License Plate Light Assembly / Installation
INSTALLATION
CAUTION / NOTICE / HINT
HINT:
- Use the same procedure for the RH and LH sides.
- The procedure listed below is for the LH side.
PROCEDURE
1. INSTALL LICENSE PLATE LIGHT ASSEMBLY
(a) Set the license plate light assembly as shown in the illustration.
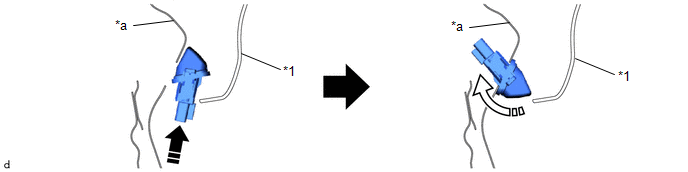
| *1 | Back Door Outside Garnish Sub-assembly | - | - |
| *a | Back Door Panel | - | - |
.png) | Set in this Direction (1) |
.png) | Set in this Direction (2) |
| (b) Engage the claws to install the license plate light assembly. |
|
.png)
(c) Connect the connector.
2. INSTALL BACK DOOR TRIM COVER
Click here
.gif)
3. INSTALL BACK DOOR TRIM BOARD
Click here
 Reassembly
REASSEMBLY CAUTION / NOTICE / HINT HINT:
Use the same procedure for the RH and LH sides.
The procedure listed below is for the LH side.
PROCEDURE 1...

Other information:
Toyota Yaris XP210 (2020-2026) Reapir and Service Manual: SRS Warning Light Remains ON
DESCRIPTION The SRS warning light is located in the combination meter assembly. When the SRS is normal, the SRS warning light comes on for approximately 6 seconds after the ignition switch is turned from off to ON, and then turns off automatically. If there is a malfunction in the SRS, the SRS warning light comes on to inform the driver of a problem...
Toyota Yaris XP210 (2020-2026) Owner's Manual: Anchor Bracket
Anchor brackets for securing child-restraint systems are equipped in the vehicle. Locate each anchor position using the illustration. To install a child-restraint system, if the seat is equipped with a head restraint, remove it. Always follow the instruction manual accompanying the child-restraint system...
Categories
- Manuals Home
- Toyota Yaris Owners Manual
- Toyota Yaris Service Manual
- Engine Start Function When Key Battery is Dead
- Key Battery Replacement
- How to use USB mode
- New on site
- Most important about car
Supplemental Restraint System (SRS) Precautions
The front and side supplemental restraint systems (SRS) include different types of air bags. Please verify the different types of air bags which are equipped on your vehicle by locating the “SRS AIRBAG” location indicators. These indicators are visible in the area where the air bags are installed.
The air bags are installed in the following locations:
The steering wheel hub (driver air bag) The front passenger dashboard (front passenger air bag) The outboard sides of the front seatbacks (side air bags) The front and rear window pillars, and the roof edge along both sides (curtain air bags)