
Toyota Yaris: Front Door Belt Moulding / Installation
INSTALLATION
CAUTION / NOTICE / HINT
HINT:
- Use the same procedure for the RH side and LH side.
- The following procedure is for the LH side.
PROCEDURE
1. INSTALL FRONT DOOR GLASS OUTER WEATHERSTRIP ASSEMBLY
(a) Engage the claws to install a new front door glass outer weatherstrip assembly as shown in the illustration.
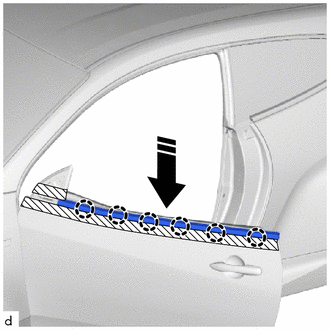
.png) | Install in this Direction |
(b) Remove the protective tape.
2. INSTALL FRONT DOOR GLASS SUB-ASSEMBLY
Click here
.gif)
3. INSTALL WINDOW REGULATOR SHIM
Click here
4. INSPECT FRONT DOOR GLASS SUB-ASSEMBLY
Click here
5. ADJUST FRONT DOOR GLASS SUB-ASSEMBLY
Click here
6. INSTALL HOLE PLUG
Click here
7. INSTALL FRONT DOOR SERVICE HOLE COVER
Click here
8. INSTALL OUTER REAR VIEW MIRROR ASSEMBLY
Click here
9. CONNECT CABLE TO NEGATIVE AUXILIARY BATTERY TERMINAL
Click here
10. INITIALIZATION AFTER RECONNECTING AUXILIARY BATTERY TERMINAL
HINT:
When disconnecting and reconnecting the auxiliary battery, there is an automatic learning function that completes learning when the respective system is used.
Click here
11. INITIALIZE POWER WINDOW CONTROL SYSTEM
Click here
12. INSPECT POWER WINDOW OPERATION
Click here
 Removal
REMOVAL CAUTION / NOTICE / HINT The necessary procedures (adjustment, calibration, initialization or registration) that must be performed after parts are removed and installed, or replaced during the front door belt moulding removal/installation are shown below...
 Name Plate
..
Other information:
Toyota Yaris XP210 (2020-2026) Reapir and Service Manual: Driver Side Door Entry Unlock Function does not Operate
DESCRIPTION If the entry unlock function does not operate for the driver door only, but the entry lock function operates, the request code is being transmitted properly from the driver door. In this case, there may be a problem related to the unlock sensor (connection between the certification ECU (smart key ECU assembly) and front door outside handle assembly LH)...
Toyota Yaris XP210 (2020-2026) Reapir and Service Manual: Skid Control ECU Communication Stop Mode
DESCRIPTION Detection Item Symptom Trouble Area Skid Control ECU Communication Stop Mode Communication stop for "Skid Control (ABS/VSC/TRAC)" is indicated on the "Communication Bus Check" screen of the GTS. Click here Brake actuator assembly branch line or connector Power source circuit of brake actuator assembly Brake actuator assembly ground circuit Brake actuator assembly WIRING DIAGRAM CAUTION / NOTICE / HINT CAUTION: When performing the confirmation driving pattern, obey all speed limits and traffic laws...
Categories
- Manuals Home
- Toyota Yaris Owners Manual
- Toyota Yaris Service Manual
- Battery Monitor Module General Electrical Failure (P058A01)
- Engine Start Function When Key Battery is Dead
- Auto Lock/Unlock Function
- New on site
- Most important about car
Turning the Engine Off
Stop the vehicle completely. Manual transaxle: Shift into neutral and set the parking brake.Automatic transaxle: Shift the selector lever to the P position and set the parking brake.
Press the push button start to turn off the engine. The ignition position is off.