Toyota Yaris: Fuel Tank / Installation
INSTALLATION
PROCEDURE
1. INSTALL CHARCOAL CANISTER OUTLET HOSE
(a) Engage the clamp to install the charcoal canister outlet hose to the fuel tank assembly.
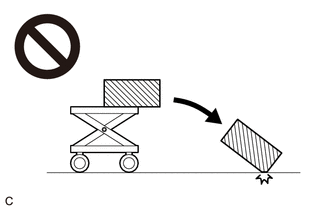
2. INSTALL FUEL TANK ASSEMBLY
CAUTION:
The fuel tank assembly is very heavy. Be sure to follow the procedure described in the repair manual, or the fuel tank assembly may fall off the engine lifter.
(a) Set the fuel tank assembly on an engine lifter.
NOTICE:
Using height adjustment attachments and plate lift attachments, keep the fuel tank assembly horizontal.
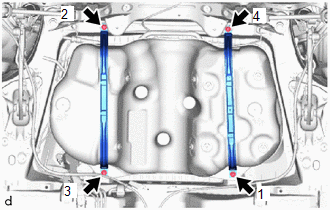
(b) Using the engine lifter, slowly raise the fuel tank assembly, and temporarily install the fuel tank assembly, fuel tank band RH and fuel tank band LH with the 4 bolts.
| (c) Tighten the 4 bolts in the order shown in the illustration. Torque: 45 N·m {459 kgf·cm, 33 ft·lbf} NOTICE:
|
|
3. INSTALL FUEL SUCTION TUBE WITH PUMP AND GAUGE ASSEMBLY
Click here

4. CONNECT NO. 6 FUEL TANK BREATHER TUBE
(a) Connect the No. 6 fuel tank breather tube.
5. CONNECT FUEL TANK FILLER PIPE SUB-ASSEMBLY
(a) Connect the fuel tank filler pipe sub-assembly.
6. INSTALL FUEL TANK TO FILLER PIPE HOSE
(a) Install the fuel tank to filler pipe hose to the fuel tank assembly and tighten the hose clamp.
7. INSTALL FUEL TANK MAIN TUBE SUB-ASSEMBLY
(a) Install the fuel tank main tube sub-assembly to the fuel pipe.
Click here

8. INSTALL NO. 1 FUEL EVAPORATION TUBE SUB-ASSEMBLY
(a) Install the No. 1 fuel evaporation tube sub-assembly to the fuel pipe.
Click here

9. INSTALL NO. 1 FUEL TANK PROTECTOR SUB-ASSEMBLY
(a) Install the No. 1 fuel tank protector sub-assembly with the 4 clips.
10. INSTALL NO. 2 FUEL TANK PROTECTOR
(a) a. Install the No. 2 fuel tank protector with the 4 clips and nut.
Torque:
10.5 N·m {107 kgf·cm}
11. INSTALL DIFFERENTIAL CARRIER ASSEMBLY
Click here

12. INSTALL FUEL TANK VENT TUBE ASSEMBLY
Click here

13. INSTALL FUEL PUMP GAUGE RETAINER
Click here

14. INSTALL NO. 1 FUEL TUBE CLAMP
Click here

15. INSTALL REAR FLOOR SERVICE HOLE COVER (for RH Side)
Click here

16. INSTALL FUEL SUCTION TUBE WITH PUMP AND GAUGE ASSEMBLY
Click here

17. ADD FUEL
 Removal
REMOVAL CAUTION / NOTICE / HINT The necessary procedures (adjustment, calibration, initialization or registration) that must be performed after parts are removed and installed, or replaced during fuel tank assembly removal/installation are shown below...

Other information:
Toyota Yaris XP210 (2020-2026) Reapir and Service Manual: Components
C..
Toyota Yaris XP210 (2020-2026) Reapir and Service Manual: Precaution
PRECAUTION HANDLING PRECAUTIONS FOR SRS AIRBAG SYSTEM CAUTION: This vehicle is equipped with a Supplemental Restraint System (SRS). Failure to carry out service operations in the correct sequence could cause the SRS to unexpectedly deploy during servicing...
Categories
- Manuals Home
- Toyota Yaris Owners Manual
- Toyota Yaris Service Manual
- Immobilizer System
- Adjustment
- Brake System Control Module "A" System Voltage System Voltage Low (C137BA2)
- New on site
- Most important about car
Fuel Gauge
The fuel gauge shows approximately how much fuel is remaining in the tank when the ignition is switched ON. We recommend keeping the tank over 1/4 full.
