Toyota Yaris: Wiper / Washer / Front Wiper Motor
Components
COMPONENTS
ILLUSTRATION
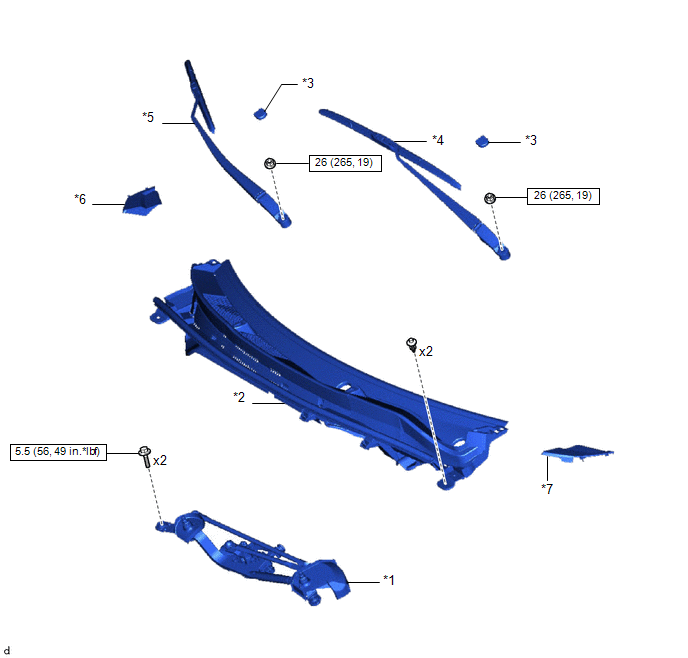
| *1 | WINDSHIELD WIPER MOTOR AND LINK | *2 | COWL TOP VENTILATOR LOUVER SUB-ASSEMBLY |
| *3 | FRONT WIPER ARM HEAD CAP | *4 | FRONT WIPER ARM AND BLADE ASSEMBLY LH |
| *5 | FRONT WIPER ARM AND BLADE ASSEMBLY RH | *6 | FRONT FENDER TO COWL SIDE SEAL RH |
| *7 | FRONT FENDER TO COWL SIDE SEAL LH | - | - |
.png) | N*m (kgf*cm, ft.*lbf): Specified torque | - | - |
ILLUSTRATION
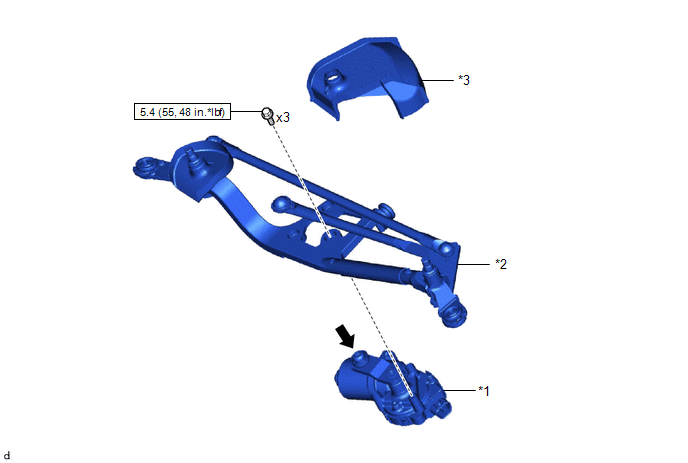
| *1 | WINDSHIELD WIPER MOTOR ASSEMBLY | *2 | WINDSHIELD WIPER LINK |
| *3 | NO. 1 WINDSHIELD WIPER SHAFT COVER | - | - |
|
| N*m (kgf*cm, ft.*lbf): Specified torque |
.png) | MP grease |
On-vehicle Inspection
ON-VEHICLE INSPECTION
PROCEDURE
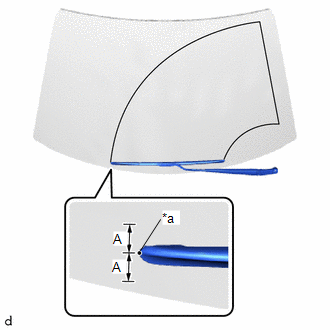
1. INSPECT WINDSHIELD WIPER MOTOR ASSEMBLY
(a) for LH Side:
(1) Operate the windshield wiper motor assembly.
(2) Stop the windshield wiper motor assembly operation.
| (3) Check the automatic stop (park) position. HINT: After the front wiper motor is stopped, check the automatic stop position after lifting the wiper blade 2 times. Standard Clearance:
OK: The front wiper stops at the position shown in the illustration. |
|
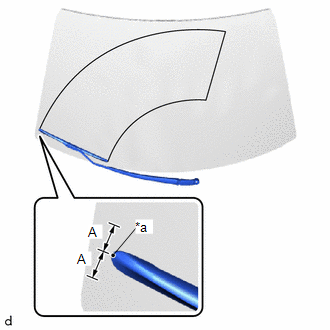
(b) for RH Side:
(1) Operate the windshield wiper motor assembly.
(2) Stop the windshield wiper motor assembly operation.
| (3) Check the automatic stop (park) position. HINT: After the front wiper motor is stopped, check the automatic stop position after lifting the wiper blade 2 times. Standard Clearance:
OK: The front wiper stops at the position shown in the illustration. |
|
Inspection
INSPECTION
CAUTION / NOTICE / HINT
CAUTION:
Ensure that fingers or articles of clothing do not get caught in moving parts when performing this test.
PROCEDURE
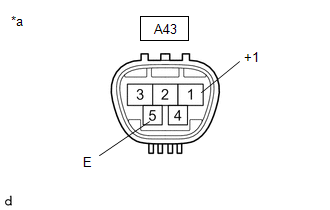
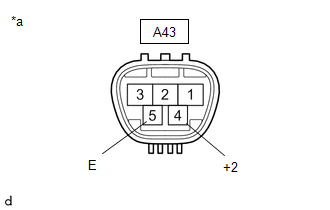
1. INSPECT WINDSHIELD WIPER MOTOR ASSEMBLY
(a) Check the LO operation.
| (1) Apply auxiliary battery voltage to the windshield wiper motor connector and check the speed of the windshield wiper motor assembly. OK:
If the result is not as specified, replace the windshield wiper motor assembly. |
|
(b) Check the HI operation.
| (1) Apply auxiliary battery voltage to the windshield wiper motor connector and check the speed of the windshield wiper motor assembly. OK:
If the result is not as specified, replace the windshield wiper motor assembly. |
|


Other information:
Toyota Yaris XP210 (2020-2026) Reapir and Service Manual: Installation
INSTALLATION PROCEDURE 1. INSTALL WINDSHIELD WIPER SWITCH ASSEMBLY (a) Turn the steering wheel assembly to the right. (b) Engage the claw to install the windshield wiper switch assembly as shown in the illustration. Install in this Direction 2...
Toyota Yaris XP210 (2020-2026) Owner's Manual: Low Engine Coolant Temperature Indicator Light (Blue)
The light illuminates continuously when the engine coolant temperature is low and turns off after the engine is warm. If the low engine coolant temperature indicator light remains illuminated after the engine has been sufficiently warmed up, the temperature sensor could have a malfunction...
Categories
- Manuals Home
- Toyota Yaris Owners Manual
- Toyota Yaris Service Manual
- Maintenance
- Removal
- Auto Lock/Unlock Function
- New on site
- Most important about car
Refueling
Before refueling, close all the doors, windows, and the liftgate/trunk lid, and switch the ignition OFF.
To open the fuel-filler lid, pull the remote fuel-filler lid release.
