
Toyota Yaris: Steering Column Assembly / Disassembly
DISASSEMBLY
CAUTION / NOTICE / HINT
NOTICE:
- Do not drop the power steering ECU assembly, strike it with tools or subject it to impacts.
- If the power steering ECU assembly is subjected to an impact, replace it with a new one.
- Do not pull the wire harness.
- Do not allow any moisture to come into contact with the power steering ECU assembly.
- Do not loosen any bolts not mentioned in the procedure.
- Do not allow any foreign matter to contaminate the power steering ECU assembly.
PROCEDURE
1. REMOVE STEERING LOCK ACTUATOR OR UPPER BRACKET ASSEMBLY
(a) Secure the steering column assembly in a vise between aluminum plates.
NOTICE:
Do not overtighten the vise.
| (b) Using SST, strike a punch mark for drilling in the center of the steering lock set bolt. SST: 09622-00010 NOTICE: When striking the punch mark, in order to prevent impact force from being applied to the steering lock actuator or upper bracket assembly, do not use a normal center punch. |
|
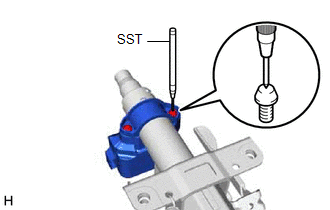
(c) Using a drill, drill a hole in the 2 steering lock set bolts and insert a screw extractor.
(d) Using the screw extractor, remove the 2 steering lock set bolts, upper steering column clamp and steering lock actuator or upper bracket assembly.
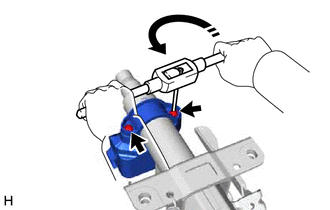
 | Turn |
2. REMOVE POWER STEERING ECU ASSEMBLY
Click here

3. REMOVE ELECTRIC POWER STEERING MOTOR SHAFT DAMPER
Click here

 Removal
REMOVAL CAUTION / NOTICE / HINT The necessary procedures (adjustment, calibration, initialization, or registration) that must be performed after parts are removed and installed, or replaced during the electric power steering column sub-assembly removal/installation are shown below...
 Inspection
INSPECTION PROCEDURE 1. INSPECT PRELOAD (a) Secure the steering column assembly in a vise using aluminum plates, cloths and wooden blocks. NOTICE:
Do not overtighten the vise, as the steering column assembly may become deformed...
Other information:
Toyota Yaris XP210 (2020-2026) Reapir and Service Manual: Data List / Active Test
DATA LIST / ACTIVE TEST DATA LIST NOTICE: In the table below, the values listed under "Normal Condition" are reference values. Do not depend solely on these reference values when deciding whether a part is faulty or not. HINT: Using the GTS to read the Data List allows the values or states of switches, sensors, actuators and other items to be read without removing any parts...
Toyota Yaris XP210 (2020-2026) Reapir and Service Manual: Power Steering Torque Sensor "A" Signal Compare Failure (C151162,C151187,C151262,C151287)
DESCRIPTION The power steering ECU assembly supplies a voltage of 5 V to the torque sensor (electric power steering column sub-assembly) and monitors the voltage value of the Hall IC inside the torque sensor (electric power steering column sub-assembly) which changes in response to changes in the magnetic flux density (steering torque) detected by the Hall IC, and calculates the assist torque...
Categories
- Manuals Home
- Toyota Yaris Owners Manual
- Toyota Yaris Service Manual
- Engine Start Function When Key Battery is Dead
- Opening and Closing the Liftgate/Trunk Lid
- To Set Speed
- New on site
- Most important about car
Supplemental Restraint System (SRS) Precautions
The front and side supplemental restraint systems (SRS) include different types of air bags. Please verify the different types of air bags which are equipped on your vehicle by locating the “SRS AIRBAG” location indicators. These indicators are visible in the area where the air bags are installed.
The air bags are installed in the following locations:
The steering wheel hub (driver air bag) The front passenger dashboard (front passenger air bag) The outboard sides of the front seatbacks (side air bags) The front and rear window pillars, and the roof edge along both sides (curtain air bags)