Toyota Yaris: Rear Crankshaft Oil Seal / Components
COMPONENTS
ILLUSTRATION
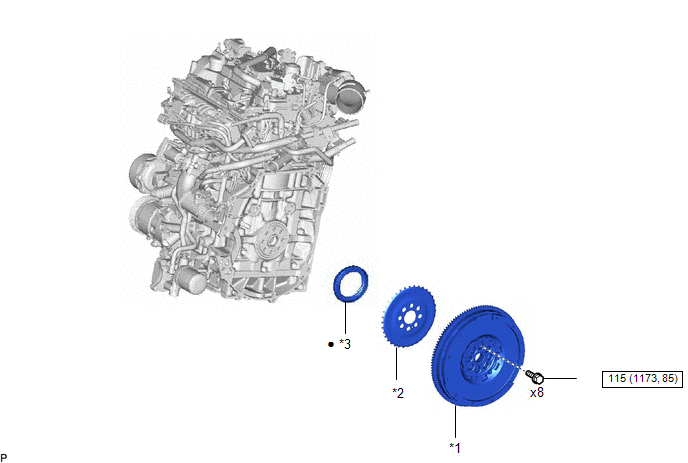
| *1 | FLYWHEEL SUB-ASSEMBLY | *2 | NO. 1 CRANKSHAFT POSITION SENSOR PLATE |
| *3 | REAR ENGINE OIL SEAL | - | - |
 | Tightening torque for "Major areas involving basic vehicle performance such as moving/turning/stopping" : N*m (kgf*cm, ft.*lbf) | ● | Non-reusable part |
| ★ | Precoated part | - | - |

 Removal
REMOVAL CAUTION / NOTICE / HINT The necessary procedures (adjustment, calibration, initialization, or registration) that must be performed after parts are removed, installed, or replaced during the rear engine oil seal removal/installation are shown below...
Other information:
Toyota Yaris XP210 (2020-2026) Reapir and Service Manual: Data List / Active Test
DATA LIST / ACTIVE TEST DATA LIST HINT: Using the GTS to read the Data List allows the values or states of switches, sensors, actuators and other items to be read without removing any parts. This non-intrusive inspection can be very useful because intermittent conditions or signals may be discovered before parts or wiring is disturbed...
Toyota Yaris XP210 (2020-2026) Reapir and Service Manual: Components
COMPONENTS ILLUSTRATION *1 FRONT SEAT HEADREST ASSEMBLY *2 FRONT OUTER SEAT TRACK BRACKET COVER *3 FRONT INNER SEAT TRACK BRACKET COVER *4 OUTER SEAT TRACK BRACKET COVER *5 INNER SEAT TRACK BRACKET COVER *6 FRONT SEAT ASSEMBLY Tightening torque for "Major areas involving basic vehicle performance such as moving/turning/stopping" : N*m (kgf*cm, ft...
Categories
- Manuals Home
- Toyota Yaris Owners Manual
- Toyota Yaris Service Manual
- G16e-gts (engine Mechanical)
- Battery Monitor Module General Electrical Failure (P058A01)
- Headlights
- New on site
- Most important about car
Keys

To use the auxiliary key, press the knob and pull out the auxiliary key from the smart key.

Copyright © 2026 www.toyaris4.com