Toyota Yaris: Bluetooth® / Component Parts
Audio unit
Talk button, Pick-up button and Hang-up button
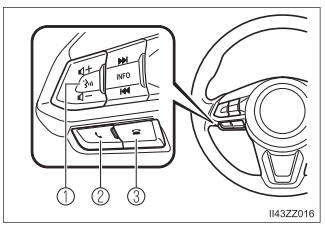
- Talk button
- Pick-up button
- Hang-up button
Microphone
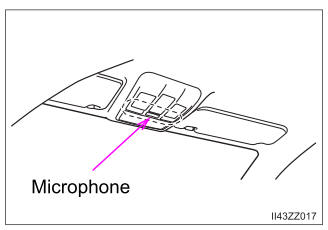
Microphone (hands-free)
The microphone is used for speaking voice commands or when making a Hands-free call.
Talk button, Pick-Up button and Hang-Up button (hands-free)
The basic functions of Bluetooth® Hands-Free can be used for such things as making calls or hanging up using the talk, pick-up and hang-up buttons on the steering wheel.
Commander switch
The commander switch is used for volume adjustment and display operation. Tilt or turn the commander knob to move the cursor. Press the commander knob to select the icon.
Volume adjustment
The volume dial of the commander switch is used to adjust the volume. Turn the dial to the right to increase volume, to the left to decrease it.
The volume can also be adjusted using the volume button on the steering wheel.
- Press the volume dial to switch the audio MUTE on and off.
- If the volume is lower compared to other audio modes, increase the volume from the device side.
Conversation volume and the volume of the voice guidance and ringtone can each be set in advance.
Select the  icon on the home
screen and display the Communication screen.
icon on the home
screen and display the Communication screen.
Select  .
.
Adjust the  and the
 using the slider.
 Bluetooth®
Bluetooth® Hands-Free outline
When a Bluetooth® device (mobile phone) is connected to the vehicle’s
Bluetooth® unit via radio wave transmission, a call can be
made or received by pressing the talk button, pick-up button, or
hang-up button on the audio remote control switch, or by operating
the center display...
 Bluetooth® Preparation
Device pairing
To use Bluetooth® audio and Hands-Free, the device equipped with
Bluetooth® has to be paired to the unit using the following procedure...
Other information:
Toyota Yaris XP210 (2020-2026) Reapir and Service Manual: 4WD/AWD Range Actuator Temperature Sensor Circuit Range/Performance Circuit Voltage Out of Range (C11411C)
DESCRIPTION When a malfunction has occurred in the AWD coupling solenoid system, the AWD ECU assembly stores DTC C11411C. DTC No. Detection Item DTC Detection Condition Trouble Area Warning Indicate Memory C11411C 4WD/AWD Range Actuator Temperature Sensor Circuit Range/Performance Circuit Voltage Out of Range Even though it can be inferred from the driving conditions that the coupling is generating a significant amount of heat, the temperature sensor value is approximately -10°C (14°F) for 1 second or more, and this continues despite the ignition switch being turned off and then ON again 2 times Even though the engine coolant temperature received from the ECM is less than 35°C (95°F), the temperature sensor value is fixed at 155°C (311°F) (short circuit condition), and this continues despite the ignition switch being turned off and then ON again 2 times The temperature sensor power source voltage is 0...
Toyota Yaris XP210 (2020-2026) Reapir and Service Manual: Components
COMPONENTS ILLUSTRATION *1 NO. 1 ENGINE UNDER COVER ASSEMBLY - - N*m (kgf*cm, ft.*lbf): Specified torque - - ILLUSTRATION *1 WATER GUARD PLATE RH *2 NO. 1 FRONT VENTILATOR SEAL *3 OUTER COWL TOP PANEL SUB-ASSEMBLY - - N*m (kgf*cm, ft...
Categories
- Manuals Home
- Toyota Yaris Owners Manual
- Toyota Yaris Service Manual
- Fuse Panel Description
- Key Battery Replacement
- Engine & Hybrid System
- New on site
- Most important about car
Refueling
Before refueling, close all the doors, windows, and the liftgate/trunk lid, and switch the ignition OFF.
To open the fuel-filler lid, pull the remote fuel-filler lid release.
