Toyota Yaris: G16e-gts (battery / Charging) / Auxiliary Battery
Components
COMPONENTS
ILLUSTRATION
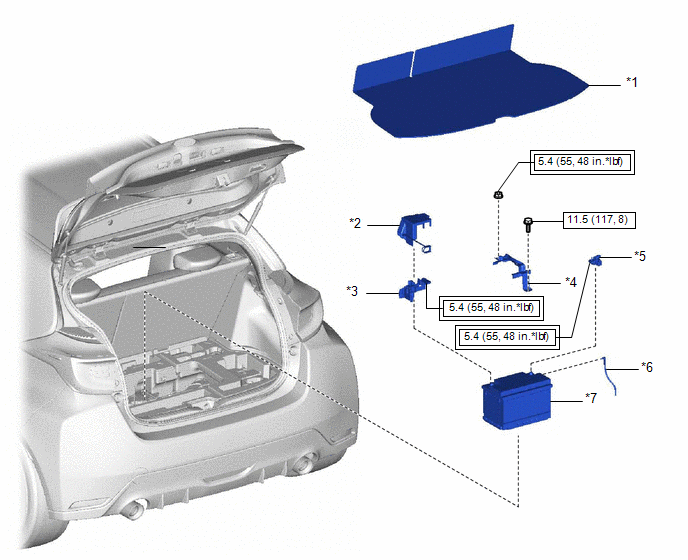
| *1 | DECK BOARD ASSEMBLY | *2 | FUSIBLE LINK COVER |
| *3 | POSITIVE AUXILIARY BATTERY TERMINAL | *4 | BATTERY CLAMP SUB-ASSEMBLY |
| *5 | NEGATIVE AUXILIARY BATTERY TERMINAL | *6 | BATTERY HOSE |
| *7 | AUXILIARY BATTERY | - | - |
 | Tightening torque for "Major areas involving basic vehicle performance such as moving/turning/stopping": N*m (kgf*cm, ft.*lbf) |
 | N*m (kgf*cm, ft.*lbf): Specified torque |
When Auxiliary Battery Is Discharged
WHEN AUXILIARY BATTERY IS DISCHARGED
WHEN AUXILIARY BATTERY IS DISCHARGED
NOTICE:
Never use a quick charger.
HINT:
-
The following problems indicate that the auxiliary battery is discharged:
- No display appears on the instrument panel when the ignition switch is turned ON.
- The headlights are dim.
- The sound from the horn is weak.
- "12-Volt Battery Charging System Malfunction Stop in a Safe Place See Owner's Manual" is displayed on the multi-information display.
- The booster terminal cannot be used to rescue a vehicle with a discharged auxiliary battery.
(a) Set the shift position to N and engage the parking brake.
(b) Make sure to carry the electrical key transmitter sub-assembly and check that the ignition switch is off.
(c) Open the booster terminal cover.
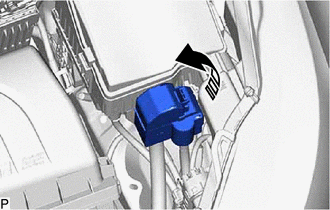
 | Remove in this Direction |
(d) Using booster cables, connect the 12 V auxiliary battery of the rescue vehicle to the auxiliary battery of the stalled vehicle as shown in the illustration.
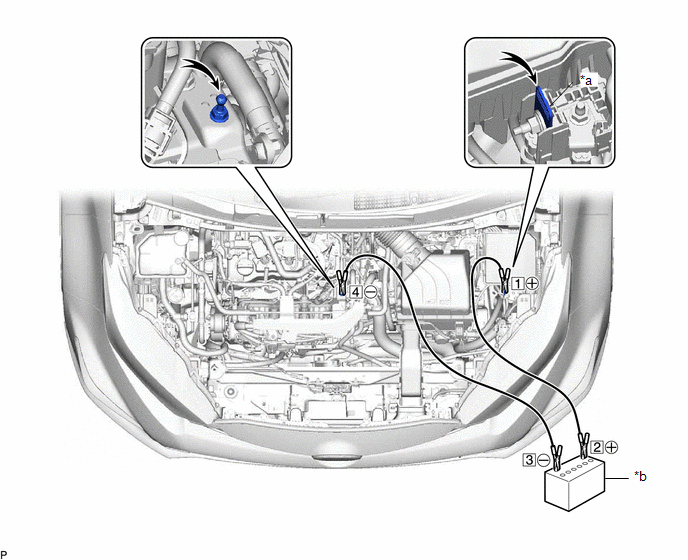
| *a | Booster Terminal | *b | Auxiliary battery of Rescue Vehicle |
| Connecting Sequence | Connecting Location |
|---|---|
| 1 | Booster terminal of stalled vehicle |
| 2 | Positive (+) auxiliary battery terminal of rescue vehicle |
| 3 | Negative (-) auxiliary battery terminal of rescue vehicle |
| 4 | Position shown in the illustration on stalled vehicle |
(e) Start the engine of the rescue vehicle and run its engine a slightly elevated speed for approximately 5 minutes in order to charge the auxiliary battery of the stalled vehicle.
(f) With the ignition switch off, open and close any door.
(g) With the engine of the rescue vehicle being run at a slightly elevated speed, turn the ignition switch START from ON to start the engine.
NOTICE:
Immediately disconnect the booster cables in the reverse order of connection after the engine has started.
HINT:
When disconnecting and reconnecting the auxiliary battery, there is an automatic learning function thatcompletes learning when the respective system is used.
Click here


 Battery Current Sensor
ComponentsCOMPONENTS ILLUSTRATION
*1 DECK BOARD ASSEMBLY *2 NO. 2 FRAME WIRE *3 BATTERY STATE SENSOR ASSEMBLY - -
Tightening torque for "Major areas involving basic vehicle performance such as moving/turning/stopping": N*m (kgf*cm, ft...
Other information:
Toyota Yaris XP210 (2020-2026) Reapir and Service Manual: Terminals Of Ecu
TERMINALS OF ECU CHECK CERTIFICATION ECU (SMART KEY ECU ASSEMBLY) (a) Disconnect the H46 certification ECU (smart key ECU assembly) connector. (b) Measure the voltage and resistance according to the value(s) in the table below. Tester Connection Terminal Description Condition Specified Condition Related Data List Item H46-29 (E) - Body ground Ground Always Below 1 Ω - H46-6 (+B) - H46-29 (E) Power supply Always 11 to 14 V - H45-22 (CUTB) - H46-29 (E) Dark current cut pin* Ignition switch off 11 to 14 V - *: In order to prevent the vehicle auxiliary battery from being depleted when the vehicle is shipped long distances, a fuse that cuts unnecessary electrical load while the vehicle is being shipped is installed in the circuit...
Toyota Yaris XP210 (2020-2026) Owner's Manual: Audio Control Switch Operation
Adjusting the Volume To increase the volume, press up the volume switch ( + ). To decrease the volume, press down the volume switch ( ̶ ). Seek Switch AM/FM radio Press the seek switch ( , ). The radio switches to the next/previous stored station in the order that it was stored...
Categories
- Manuals Home
- Toyota Yaris Owners Manual
- Toyota Yaris Service Manual
- Diagnostic Trouble Code Chart
- Immobilizer System
- Removal
- New on site
- Most important about car
Refueling
Before refueling, close all the doors, windows, and the liftgate/trunk lid, and switch the ignition OFF.
To open the fuel-filler lid, pull the remote fuel-filler lid release.
