Toyota Yaris: Window / Glass / Window Defogger Wire
On-vehicle Inspection
ON-VEHICLE INSPECTION
PROCEDURE
1. INSPECT DEFOGGER WIRE (BACK DOOR GLASS)
NOTICE:
- When cleaning the glass, wipe the glass along the wire using a soft, dry cloth. Take care not to damage the defogger wires.
- Do not use detergents or glass cleaners that have abrasive ingredients.
- When measuring voltage, wrap a piece of tin foil around the tip of the negative (-) tester probe and press the foil against the wire with your finger as shown in the illustration.
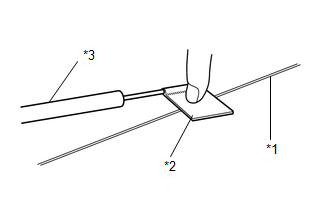
| *1 | Defogger Wire |
| *2 | Tin Foil |
| *3 | Tester Probe |
(a) Turn the ignition switch to ON.
(b) Turn the defogger switch on.

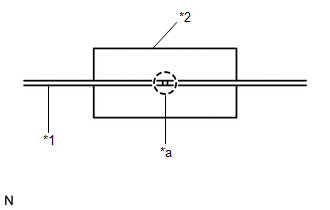
| *a | Center |
(c) Measure the voltage at the center of each defogger wire as shown in the illustration.
Standard Voltage:
| Voltage | Criteria |
|---|---|
| Approximately 5 V | Wire is not broken |
| Approximately 10 or 0 V | Wire is broken |
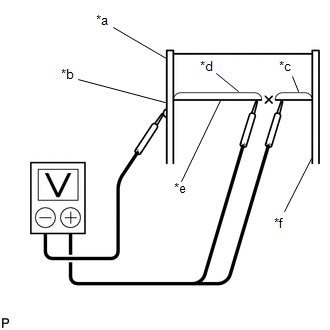
| *a | Ground Side |
| *b | Foil Strip |
| *c | Approximately 10 V |
| *d | 0 V |
| *e | Broken Wire |
| *f | Battery Side |
HINT:
If there is approximately 10 V, the wire may be faulty between the center of the wire and the wire end on the battery side. If there is no voltage, the wire may be faulty between the center of the wire end and the wire end on the ground side.
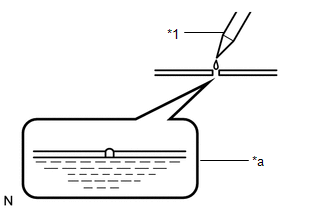
(d) Place the voltmeter's positive (+) lead against the defogger wire on the battery side.
(e) Place the voltmeter's negative (-) lead with the foil strip against the wire on the ground side.
(f) Slide the positive (+) lead from the battery side to the ground side.
(g) The point where the voltage drops from approximately 10 V to 0 V is where the defogger wire is broken.
HINT:
If the defogger wire is not broken, the voltmeter indicates 0 V at the positive (+) end of the defogger wire and gradually increases to approximately 12 V as the meter probe moves to the other end.
Repair
REPAIR
PROCEDURE
1. REPAIR DEFOGGER WIRE (BACK DOOR GLASS)
| (a) Clean the broken wire tips with grease, wax and silicone remover. |
|
(b) Place masking tape along both sides of the wire.
(c) Thoroughly mix the repair agent.
| (d) Using a fine tip brush, apply a small amount of the agent to the wire. |
|
(e) After a few minutes, remove the masking tape.
NOTICE:
Do not repair the defogger wire again for at least 24 hours.
 Rear Window Defogger System does not Operate
DESCRIPTION An operation request signal is sent to the air conditioning amplifier assembly via LIN communication when the rear window defogger switch (air conditioning control assembly) is operated...

Other information:
Toyota Yaris XP210 (2020-2026) Reapir and Service Manual: Vehicle Control History
VEHICLE CONTROL HISTORY CHECK VEHICLE CONTROL HISTORY HINT: The vehicle control history data stores the history of the reject function and system protection operations. The number of occurrences, date and distance are stored in batches for each item...
Toyota Yaris XP210 (2020-2026) Reapir and Service Manual: Gf1a Transfer Oil
ComponentsCOMPONENTS ILLUSTRATION *1 NO. 1 ENGINE UNDER COVER ASSEMBLY *2 TRANSFER FILLER PLUG *3 TRANSFER DRAIN PLUG *4 GASKET Tightening torque for "Major areas involving basic vehicle performance such as moving/turning/stopping": N*m (kgf*cm, ft...
Categories
- Manuals Home
- Toyota Yaris Owners Manual
- Toyota Yaris Service Manual
- Engine Start Function When Key Battery is Dead
- Engine & Hybrid System
- Battery Monitor Module General Electrical Failure (P058A01)
- New on site
- Most important about car
Break-In Period
No special break-in is necessary, but a few precautions in the first 600 miles (1,000 km) may add to the performance, economy, and life of the vehicle.
Do not race the engine. Do not maintain one constant speed, either slow or fast, for a long period of time. Do not drive constantly at full-throttle or high engine rpm for extended periods of time. Avoid unnecessary hard stops. Avoid full-throttle starts.