Toyota Yaris: Mirror (ext) / Outer Rear View Mirror Cover
Toyota Yaris XP210 (2020-2026) Reapir and Service Manual / Vehicle Exterior / Mirror (ext) / Outer Rear View Mirror Cover
Components
COMPONENTS
ILLUSTRATION
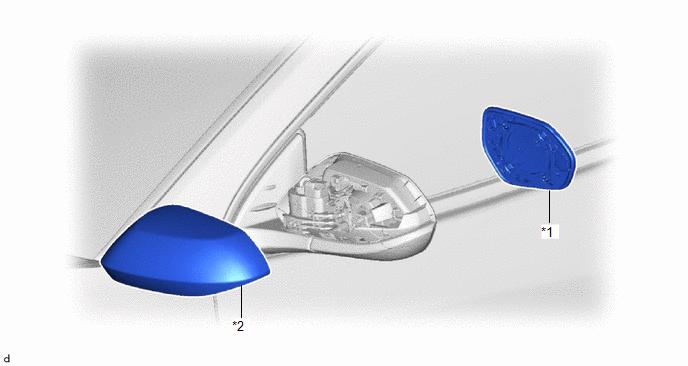
| *1 | OUTER MIRROR | *2 | OUTER MIRROR COVER |
Removal
REMOVAL
CAUTION / NOTICE / HINT
HINT:
- Use the same procedure for the RH side and LH side.
- The following procedure is for the LH side.
PROCEDURE
1. REMOVE OUTER MIRROR
Click here
.gif)
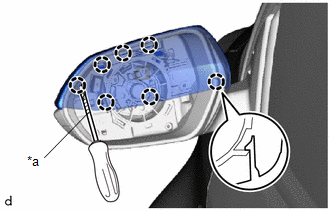
2. REMOVE OUTER MIRROR COVER
| (a) Using a screwdriver with its tip wrapped in protective tape, disengage the claws from upper side to remove the outer mirror cover. |
|
Installation
INSTALLATION
CAUTION / NOTICE / HINT
HINT:
- Use the same procedure for the RH side and LH side.
- The following procedure is for the LH side.
PROCEDURE
1. INSTALL OUTER MIRROR COVER
| (a) Engage the claws to install the outer mirror cover. |
|

2. INSTALL OUTER MIRROR
Click here
.gif)
 Installation
INSTALLATION CAUTION / NOTICE / HINT HINT:
Use the same procedure for the RH side and LH side.
The following procedure is for the LH side.
PROCEDURE 1...
 Outer Rear View Mirror Glass
ComponentsCOMPONENTS ILLUSTRATION
*1 OUTER MIRROR - - RemovalREMOVAL CAUTION / NOTICE / HINT HINT:
Use the same procedure for the RH side and LH side...
Other information:
Toyota Yaris XP210 (2020-2026) Reapir and Service Manual: Room Temperature Sensor Circuit Short to Ground (B141A11)
DESCRIPTION The cooler thermistor (room temperature sensor) is installed in the instrument panel to detect the cabin temperature, which is used to control the air conditioning system. The resistance of the cooler thermistor (room temperature sensor) changes in accordance with the cabin temperature...
Toyota Yaris XP210 (2020-2026) Reapir and Service Manual: Utility
U..
Categories
- Manuals Home
- Toyota Yaris Owners Manual
- Toyota Yaris Service Manual
- Key Battery Replacement
- Maintenance
- Diagnostic Trouble Code Chart
- New on site
- Most important about car
Refueling
Before refueling, close all the doors, windows, and the liftgate/trunk lid, and switch the ignition OFF.
To open the fuel-filler lid, pull the remote fuel-filler lid release.

Copyright © 2026 www.toyaris4.com