Toyota Yaris: Headlight Assembly / Installation
INSTALLATION
CAUTION / NOTICE / HINT
HINT:
- Use the same procedure for the RH side and LH side.
- The following procedure is for the LH side.
PROCEDURE
1. INSTALL HEADLIGHT ASSEMBLY
(a) Temporarily install the headlight assembly as shown in the illustration.
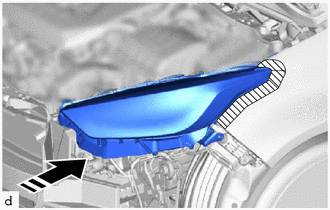
.png) | Install in this Direction |
(b) Install the headlight assembly with the 3 screws.
| (c) Connect the 2 connectors and engage the clamp. |
|
.png)
(d) Remove the protective tape.
2. INSTALL FRONT BUMPER ASSEMBLY
Click here
.gif)
3. ADJUST HEADLIGHT AIMING
Click here
 Reassembly
REASSEMBLY CAUTION / NOTICE / HINT NOTICE:
Handle components indoors as much as possible to prevent foreign matter from entering and adhering to headlight assembly components...

Other information:
Toyota Yaris XP210 (2020-2026) Reapir and Service Manual: Lost Communication with Front Panel LIN Missing Message (B14B287)
DESCRIPTION The air conditioning control assembly communicates with the air conditioning amplifier assembly via LIN communication. If a malfunction occurs in the LIN communication system, the air conditioning amplifier assembly will not operate, even if the air conditioning control assembly is operated...
Toyota Yaris XP210 (2020-2026) Reapir and Service Manual: Dtc Check / Clear
DTC CHECK / CLEAR NOTICE: When the diagnosis system is changed from normal mode to check mode or vice versa, all DTCs and Freeze Frame Data recorded in normal mode are cleared. Before changing modes, always check and make a note of DTCs and Freeze Frame Data...
Categories
- Manuals Home
- Toyota Yaris Owners Manual
- Toyota Yaris Service Manual
- How to connect USB port/Auxiliary jack
- Maintenance
- Headlights
- New on site
- Most important about car
Keys

To use the auxiliary key, press the knob and pull out the auxiliary key from the smart key.

Copyright © 2026 www.toyaris4.com