Toyota Yaris: Window / Glass / Front Passenger Side Power Window Switch
Components
COMPONENTS
ILLUSTRATION
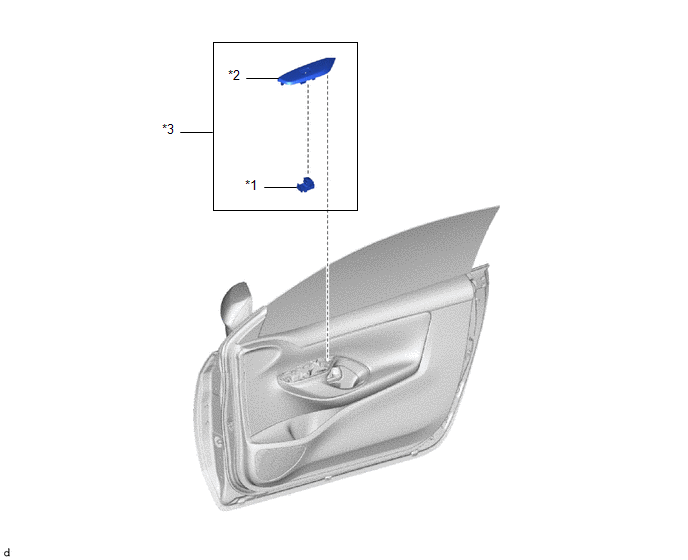
| *1 | POWER WINDOW REGULATOR SWITCH ASSEMBLY | *2 | FRONT ARMREST BASE UPPER PANEL |
| *3 | POWER WINDOW REGULATOR SWITCH ASSEMBLY WITH FRONT DOOR ARMREST BASE UPPER PANEL | - | - |
Removal
REMOVAL
PROCEDURE
1. REMOVE POWER WINDOW REGULATOR SWITCH ASSEMBLY WITH FRONT ARMREST BASE UPPER PANEL
Click here
.gif)
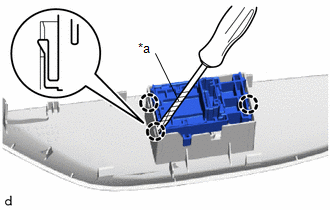
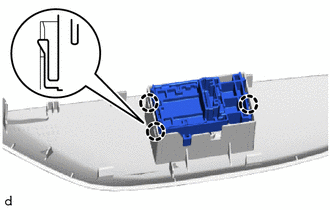
2. REMOVE POWER WINDOW REGULATOR SWITCH ASSEMBLY
| (a) Using a screwdriver with its tip wrapped in protective tape, disengage the claws to remove the power window regulator switch assembly. |
|
Inspection
INSPECTION
PROCEDURE
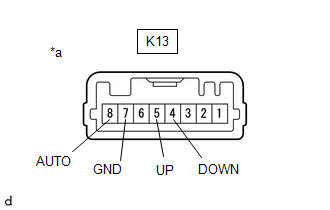
1. INSPECT POWER WINDOW REGULATOR SWITCH ASSEMBLY
(a) Check the resistance.
| (1) Measure the resistance according to the value(s) in the table below. Standard Resistance:
If the result is not as specified, replace the power window regulator switch assembly. |
|
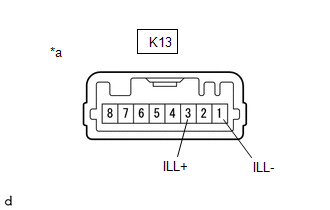
(b) Check that the LED illuminates.
| (1) Apply auxiliary battery voltage to the power window regulator switch assembly and check that the LED illuminate. OK:
If the result is not as specified, replace the power window regulator switch assembly. |
|
Installation
INSTALLATION
PROCEDURE
1. INSTALL POWER WINDOW REGULATOR SWITCH ASSEMBLY
| (a) Engage the claws to install the power window regulator switch assembly. |
|
2. INSTALL POWER WINDOW REGULATOR SWITCH ASSEMBLY WITH FRONT ARMREST BASE UPPER PANEL
Click here
.gif)
 Installation
INSTALLATION CAUTION / NOTICE / HINT NOTICE: Make sure to use Toyota Genuine Windshield Glass Adhesive (High Modulus Type) or equivalent. PROCEDURE 1. CLEAN BACK DOOR GLASS (a) When reusing the back door glass: (1) Using a scraper, remove any remaining adhesive residue from the back window glass...

Other information:
Toyota Yaris XP210 (2020-2026) Reapir and Service Manual: Installation
INSTALLATION PROCEDURE 1. INSTALL WATER INLET WITH THERMOSTAT SUB-ASSEMBLY Click here 2. INSTALL WATER INLET WITH WATER PUMP HOUSING SUB-ASSEMBLY (a) Install a new gasket to the water inlet with water pump housing sub-assembly. HINT: Be sure to clean the contact surfaces...
Toyota Yaris XP210 (2020-2026) Owner's Manual: Audio Control Switch Operation
Adjusting the Volume To increase the volume, press up the volume switch ( + ). To decrease the volume, press down the volume switch ( ̶ ). Seek Switch AM/FM radio Press the seek switch ( , ). The radio switches to the next/previous stored station in the order that it was stored...
Categories
- Manuals Home
- Toyota Yaris Owners Manual
- Toyota Yaris Service Manual
- Opening and Closing the Liftgate/Trunk Lid
- How to connect USB port/Auxiliary jack
- Maintenance
- New on site
- Most important about car
Key Suspend Function
If a key is left in the vehicle, the functions of the key left in the vehicle are temporarily suspended to prevent theft of the vehicle.
To restore the functions, press the unlock button on the functions-suspended key in the vehicle.