Toyota Yaris: Back Door Glass / Components
COMPONENTS
ILLUSTRATION
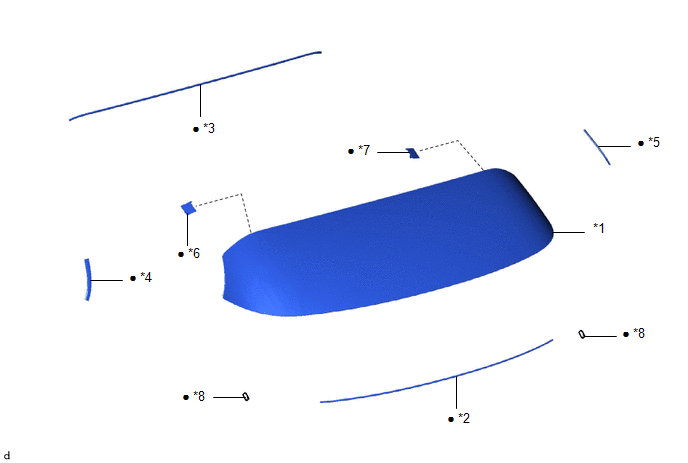
| *1 | BACK DOOR GLASS | *2 | NO. 2 BACK WINDOW GLASS ADHESIVE DAM |
| *3 | BACK WINDOW GLASS ADHESIVE DAM | *4 | NO. 1 BACK WINDOW MOULDING OUTSIDE LH |
| *5 | NO. 1 BACK WINDOW MOULDING OUTSIDE RH | *6 | BACK WINDOW GLASS CLIP LH |
| *7 | BACK WINDOW GLASS CLIP RH | *8 | BACK DOOR GLASS SPACER |
| ● | Non-reusable part | - | - |

 Removal
REMOVAL CAUTION / NOTICE / HINT NOTICE: Make sure to use Toyota Genuine Windshield Glass Adhesive (High Modulus Type) or equivalent. PROCEDURE 1. REMOVE BACK DOOR OUTSIDE GARNISH SUB-ASSEMBLY Click here
2...
Other information:
Toyota Yaris XP210 (2020-2026) Reapir and Service Manual: Check For Intermittent Problems
CHECK FOR INTERMITTENT PROBLEMS CHECK FOR INTERMITTENT PROBLEMS HINT: A momentary interruption (open circuit) in the connectors and/or wire harness between the sensors and ECUs can be detected using the Data List function of the GTS. (a) Follow the directions on the GTS to display the Data List and select areas where momentary interruption should be monitored...
Toyota Yaris XP210 (2020-2026) Reapir and Service Manual: Components
COMPONENTS ILLUSTRATION *1 NO. 1 AIR CLEANER INLET *2 RADIATOR UPPER AIR GUIDE PLATE *3 FRONT BUMPER ENERGY ABSORBER *4 FRONT BUMPER REINFORCEMENT *5 HOOD LOCK ASSEMBLY *6 UPPER RADIATOR SUPPORT SUB-ASSEMBLY N*m (kgf*cm, ft...
Categories
- Manuals Home
- Toyota Yaris Owners Manual
- Toyota Yaris Service Manual
- Key Battery Replacement
- Auto Lock/Unlock Function
- Battery Monitor Module General Electrical Failure (P058A01)
- New on site
- Most important about car
Keys

To use the auxiliary key, press the knob and pull out the auxiliary key from the smart key.

Copyright © 2026 www.toyaris4.com