Toyota Yaris: Rear View Monitor / Viewing the Display
Guide lines which indicate the width of the vehicle (yellow) are displayed on the screen as a reference to the approximate width of the vehicle in comparison to the width of the parking space you are about to back into.
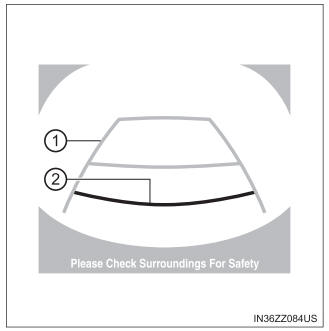
Use this display view for parking your vehicle in a parking space or garage.
- Vehicle width guide lines (yellow)
These guide lines serve as a reference to the approximate width of the vehicle.
- Distance guide lines
These guide lines indicate the approximate distance to a point measured from the vehicle’s rear (from the end of the bumper).
The red and yellow lines indicate the points about 19 in. (500 mm) for the red line and 39.3 in. (1000 mm) for the yellow lines from the rear bumper (at the center point of each of the lines).
WARNING
The guide lines on the screen are fixed lines. They are not synced to the driver’s turning of the steering wheel. Always be careful and check the area to the vehicle’s rear and the surrounding area directly with your eyes while backing up.
 Displayable Range on the Screen
The images on the screen may be different from the actual conditions.
Screen display
Actual view
The displayable range varies depending on the vehicle and road
conditions...
 Rear View Monitor Operation
The operation of the rear view monitor when reversing the vehicle varies
depending on the traffic, road, and vehicle conditions. The amount
of steering and the timing also varies depending on conditions, so
confirm the surrounding conditions directly with your eyes and steer
the vehicle in accordance with the conditions...
Other information:
Toyota Yaris XP210 (2020-2026) Reapir and Service Manual: Components
C..
Toyota Yaris XP210 (2020-2026) Reapir and Service Manual: ABS Operates Before Necessary When Braking
DESCRIPTION Troubleshooting for when ABS operates too soon due to a noisy signal from the speed sensor, a difference in output, etc. CAUTION / NOTICE / HINT NOTICE: After replacing or removing and installing a speed sensor, perform Dealer Mode (Signal Check) inspection to confirm that the speed sensors are operating correctly...
Categories
- Manuals Home
- Toyota Yaris Owners Manual
- Toyota Yaris Service Manual
- How to use USB mode
- To Set Speed
- Immobilizer System
- New on site
- Most important about car
Liftgate/Trunk Lid
WARNING
Never allow a person to ride in the luggage compartment/trunk
Allowing a person to ride in the luggage compartment/trunk is dangerous. The person in the luggage compartment/trunk could be seriously injured or killed during sudden braking or a collision.
Do not drive with the liftgate/trunk lid open