Toyota Yaris: Front Door Speaker / Installation
INSTALLATION
CAUTION / NOTICE / HINT
HINT:
- Use the same procedure for the RH and LH sides.
- The procedure listed below is for the LH side.
PROCEDURE
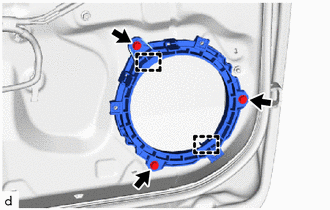
1. INSTALL FRONT NO. 1 SPEAKER BRACKET
| (a) Engage the hooks to install the front No. 1 speaker bracket. |
|
(b) Install the 3 screws.
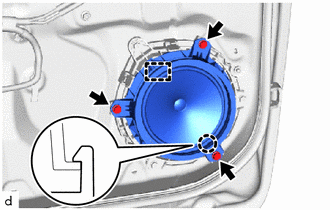
2. INSTALL FRONT NO. 1 SPEAKER ASSEMBLY
| (a) Engage the hook and claw to install the front No. 1 speaker assembly. |
|
(b) Install the 3 screws.
| (c) Engage the clamp. |
|
(d) Connect the connector.
3. INSTALL FRONT DOOR GLASS INNER WEATHERSTRIP
Click here

4. INSTALL FRONT DOOR TRIM BOARD SUB-ASSEMBLY
Click here

5. INSTALL FRONT DOOR TRIM GARNISH
Click here

6. INSTALL MULTIPLEX NETWORK MASTER SWITCH ASSEMBLY WITH FRONT ARMREST BASE UPPER PANEL (for Driver Side)
Click here

7. INSTALL POWER WINDOW REGULATOR SWITCH ASSEMBLY WITH FRONT ARMREST BASE UPPER PANEL (for Front Passenger Side)
Click here

8. INSTALL FRONT DOOR LOWER FRAME BRACKET GARNISH
Click here

 Inspection
INSPECTION PROCEDURE 1. INSPECT FRONT NO. 1 SPEAKER ASSEMBLY (for RH Side) (a) Check the resistance. (1) Measure the resistance according to the value(s) in the table below...
 Noise Filter
..
Other information:
Toyota Yaris XP210 (2020-2026) Reapir and Service Manual: Removal
REMOVAL CAUTION / NOTICE / HINT HINT: Use the same procedure for the RH and LH sides. The procedure listed below is for the LH side. PROCEDURE 1. REMOVE REAR COMBINATION LIGHT ASSEMBLY (a) Apply protective tape around the rear combination light assembly as shown in the illustration...
Toyota Yaris XP210 (2020-2026) Reapir and Service Manual: Installation
INSTALLATION PROCEDURE 1. INSTALL NO. 2 FUEL SENDER GAUGE ASSEMBLY (a) Attach the claw and install the No. 2 fuel sender gauge assembly. NOTICE: Be careful not to bend the arm of the fuel sender gauge assembly. (b) Attach the 2 clamps and connect the wire harness to the fuel tank vent tube assembly...
Categories
- Manuals Home
- Toyota Yaris Owners Manual
- Toyota Yaris Service Manual
- How to use USB mode
- Opening and Closing the Liftgate/Trunk Lid
- Diagnostic Trouble Code Chart
- New on site
- Most important about car
Front Seat Belt Pretensioners
The front seat belt pretensioners are designed to deploy in moderate or severe frontal, near frontal collisions.
In addition, the pretensioners operate when a side collision or a rollover accident is detected. The pretensioners operate differently depending on what types of air bags are equipped. For more details about the seat belt pretensioner operation, refer to the SRS Air Bag Deployment Criteria.


