Toyota Yaris: Front Door Speaker / Components
COMPONENTS
ILLUSTRATION
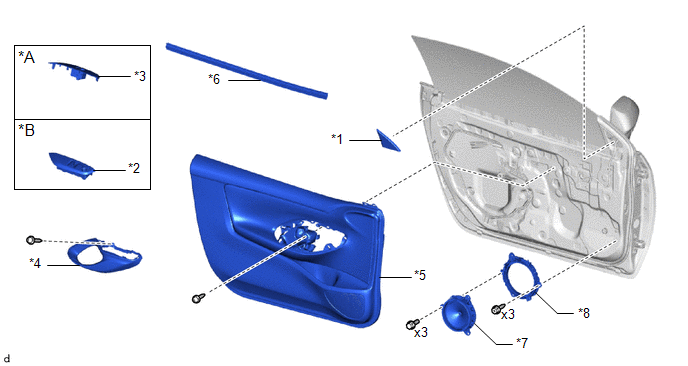
| *A | for Front Passenger Side | *B | for Driver Side |
| *1 | FRONT DOOR LOWER FRAME BRACKET GARNISH | *2 | MULTIPLEX NETWORK MASTER SWITCH ASSEMBLY WITH FRONT ARMREST BASE UPPER PANEL |
| *3 | POWER WINDOW REGULATOR SWITCH ASSEMBLY WITH FRONT ARMREST BASE UPPER PANEL | *4 | FRONT DOOR TRIM GARNISH |
| *5 | FRONT DOOR TRIM BOARD SUB-ASSEMBLY | *6 | FRONT DOOR GLASS INNER WEATHERSTRIP |
| *7 | FRONT NO. 1 SPEAKER ASSEMBLY | *8 | FRONT NO. 1 SPEAKER BRACKET |

 Removal
REMOVAL CAUTION / NOTICE / HINT HINT:
Use the same procedure for the RH and LH sides.
The procedure listed below is for the LH side.
PROCEDURE 1...
Other information:
Toyota Yaris XP210 (2020-2026) Owner's Manual: Bluetooth® Hands-Free
Phonebook Usage Telephone calls can be made by saying the contact name in the downloaded phonebook or the name of a person whose phone number has been registered in the Bluetooth® Hands-Free. Refer to Import contact (Download Phonebook). Press the talk button...
Toyota Yaris XP210 (2020-2026) Reapir and Service Manual: Lost Communication With ECM/PCM "A" Missing Message (U010087,U011487,U012987,U013187,U014087,U015187,U016887,U023587,U023A87,U111287,U113387)
DESCRIPTION The combination meter assembly communicates with each ECU via CAN communication. DTC No. Detection Item DTC Detection Condition Trouble Area U010087 Lost Communication With ECM/PCM "A" Missing Message Diagnosis Condition: The ignition switch is ON IG power source voltage is 9...
Categories
- Manuals Home
- Toyota Yaris Owners Manual
- Toyota Yaris Service Manual
- Fuel Gauge
- Key Battery Replacement
- To Set Speed
- New on site
- Most important about car
Break-In Period
No special break-in is necessary, but a few precautions in the first 600 miles (1,000 km) may add to the performance, economy, and life of the vehicle.
Do not race the engine. Do not maintain one constant speed, either slow or fast, for a long period of time. Do not drive constantly at full-throttle or high engine rpm for extended periods of time. Avoid unnecessary hard stops. Avoid full-throttle starts.
Copyright © 2026 www.toyaris4.com