Toyota Yaris: Installing Child-Restraint Systems / Front Passenger’s Seat Child-Restraint System Installation
- Make sure the ignition is switched off.
- Slide the seat as far back as possible.
- Remove the head restraint.
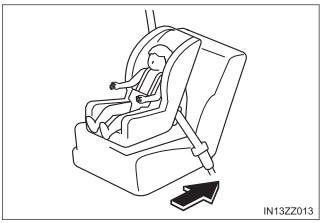
- Place the child-restraint system on the seat without putting your weight on the seat and fasten the seat belt. See the manufacturer’s instructions on the child-restraint system for belt routing instructions.
- To get the retractor into the automatic locking mode, pull the shoulder belt portion of the seat belt until the entire length of the belt is out of the retractor.
- Push the child-restraint system firmly into the vehicle seat. Be sure
the belt retracts as snugly as possible. A clicking noise from the
retractor will be heard during retraction if the system is in automatic
locking mode. If the belt does not lock the seat down tight, repeat
the previous step and also this one.
Inspect this function before each use of the child-restraint system. You should not be able to pull the shoulder belt out of the retractor while the system is in the automatic locking mode. When you remove the childrestraint system, be sure the belt fully retracts to return the system to emergency locking mode before occupants use the seat belts.
- Seat your child safely in the child-restraint system and secure the child according to the instructions from the child-restraint system manufacturer.
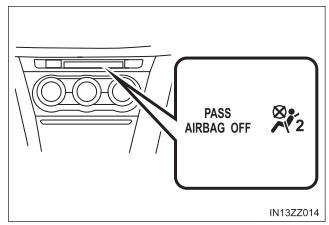
- Switch the ignition ON and make sure the front
passenger
air bag deactivation indicator
light illuminates after installing a
child-restraint system on the
front passenger seat.
If the front passenger air bag deactivation indicator light does not illuminate, remove the childrestraint system, switch the ignition to OFF, and then reinstall the child-restraint system.
Follow the child-restraint system manufacturer’s instructions carefully.
Depending on the type of child-restraint system, it may not employ seat belts which are in automatic locking mode.
WARNING
Do not seat a child in a child-restraint system on the front passenger seat if the front passenger air bag deactivation indicator light does not illuminate
While it is always better to install any child-restraint system on the rear seat, it is imperative that a child-restraint system ONLY be used on the front passenger seat if the deactivation indicator light illuminates when the child is seated in the child-restraint system. Seating a child in a childrestraint system installed on the front passenger seat with the front passenger air bag deactivation indicator light not illuminated is dangerous. If this indicator light does not illuminate, this means that the front passenger front and side air bags, and seat belt pretensioners are ready for deployment. If an accident were to deploy an air bag, a child in a child-restraint system sitting in the front passenger seat could be seriously injured or killed. If the indicator light does not illuminate after seating a child in a child-restraint system on the front passenger seat, seat a child in a child-restraint system on the rear seat and consult your Toyota dealer as soon as possible.
 If You Must Use a Child-Restraint System in the Front Seat for
Children
If You Must Use a Child-Restraint System in the Front Seat for
Children
If you cannot put all children in the rear seat, at least put the smallest
children in the rear and be sure the largest child up front uses a frontfacing
child-restraint system...
 Using LATCH Lower Anchor
Your Toyota is equipped with LATCH lower anchors for attachment of
specially designed LATCH child-restraint systems in the rear seats.
Both anchors must be used, otherwise the seat will bounce around
and put the child in danger...
Other information:
Toyota Yaris XP210 (2020-2026) Owner's Manual: Storage Compartments
WARNING Keep storage boxes closed when driving Driving with the storage boxes open is dangerous. To reduce the possibility of injury in an accident or a sudden stop, keep the storage boxes closed when driving. Do not put articles in storage spaces with no lid Putting articles in storage spaces with no lid is dangerous as they could be thrown around the cabin if the vehicle is suddenly accelerated and cause injury depending on how the article is stored...
Toyota Yaris XP210 (2020-2026) Owner's Manual: Customizable Features
The following customizable features can be set or changed by your Toyota dealer. Consult your Toyota dealer for details. Additionally, some of the customizable features can be changed by the customer depending on the feature. Customizable features which can be changed differ depending on the market and specification...
Categories
- Manuals Home
- Toyota Yaris Owners Manual
- Toyota Yaris Service Manual
- G16e-gts (engine Mechanical)
- Removal
- Engine Start Function When Key Battery is Dead
- New on site
- Most important about car
Turning the Engine Off
Stop the vehicle completely. Manual transaxle: Shift into neutral and set the parking brake.Automatic transaxle: Shift the selector lever to the P position and set the parking brake.
Press the push button start to turn off the engine. The ignition position is off.