Toyota Yaris: Roof Drip Side Finish Moulding / Removal
REMOVAL
CAUTION / NOTICE / HINT
HINT:
- Use the same procedure for the RH side and LH side.
- The following procedure is for the LH side.
PROCEDURE
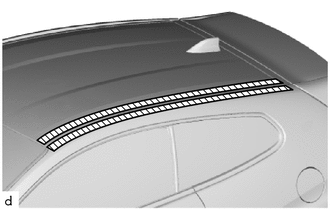
1. REMOVE ROOF DRIP SIDE MOULDING
| (a) Apply protective tape around the roof drip side moulding. |
|
(b) for 1-clip Type:
(1) Disengage the clip.
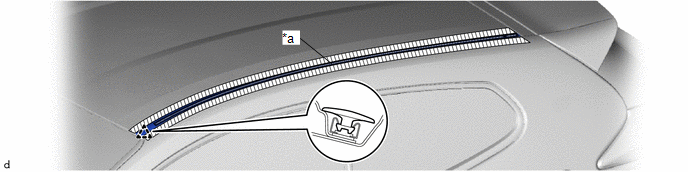
| *a | Double-sided Tape | - | - |
(2) Separate the double-sided tape to remove the roof drip side moulding.
NOTICE:
- Do not remove the roof drip side finish moulding clip.
- If a roof drip side finish moulding clip is damaged or falls off, replace it with a new one.
(c) for 2-clip Type:
(1) Disengage the clips.
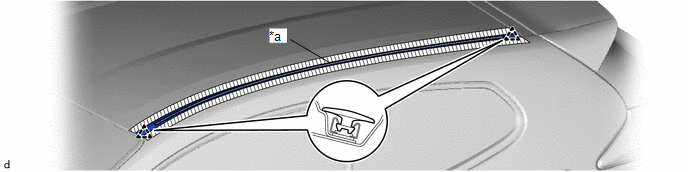
| *a | Double-sided Tape | - | - |
(2) Separate the double-sided tape to remove the roof drip side moulding.
NOTICE:
- Do not remove the roof drip side finish moulding clips.
- If a roof drip side finish moulding clip is damaged falls off, replace it with a new one.
 Components
C..
 Installation
INSTALLATION CAUTION / NOTICE / HINT HINT:
Use the same procedure for the RH side and LH side.
The following procedure is for the LH side.
PROCEDURE 1...
Other information:
Toyota Yaris XP210 (2020-2024) Reapir and Service Manual: Problem Symptoms Table
PROBLEM SYMPTOMS TABLE HINT: Use the table below to help determine the cause of problem symptoms. If multiple suspected areas are listed, the potential causes of the symptoms are listed in order of probability in the "Suspected Area" column of the table...
Toyota Yaris XP210 (2020-2024) Reapir and Service Manual: Removal
REMOVAL CAUTION / NOTICE / HINT The necessary procedures (adjustment, calibration, initialization or registration) that must be performed after parts are removed and installed, or replaced during front exhaust pipe assembly and tail exhaust pipe assembly removal/installation are shown below...
Categories
- Manuals Home
- Toyota Yaris Owners Manual
- Toyota Yaris Service Manual
- Fuel Gauge
- Immobilizer System
- Diagnostic Trouble Code Chart
- New on site
- Most important about car
Turning the Engine Off
Stop the vehicle completely. Manual transaxle: Shift into neutral and set the parking brake.Automatic transaxle: Shift the selector lever to the P position and set the parking brake.
Press the push button start to turn off the engine. The ignition position is off.
Copyright © 2024 www.toyaris4.com