Toyota Yaris: Rear Spoiler / Reassembly
REASSEMBLY
PROCEDURE
1. INSTALL REAR SPOILER SEAL
HINT:
When installing the rear spoiler seal, heat the rear spoiler assembly using a heat light.
Heating Temperature:
| Item | Temperature |
|---|---|
| Rear Spoiler Assembly | 20 to 30°C (68 to 86°F) |
CAUTION:
- Do not touch the heat light and heated parts, touching the heat light may result in burns.
- Touching heated parts for a long time may result in burns.
.png)
| *a | Heated Part |
| *b | Heat Light |
NOTICE:
Do not heat the rear spoiler assembly excessively.
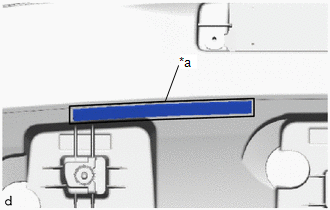
(a) Clean the rear spoiler assembly surface.
(1) Using a heat light, heat the rear spoiler assembly surface.
(2) Remove the double-sided tape from the rear spoiler assembly.
(3) Wipe off any tape adhesive residue with cleaner.
(b) Using a heat light, heat the rear spoiler assembly.
(c) Remove the release paper from a new rear spoiler seal.
HINT:
After removing the release paper, keep the exposed adhesive free from foreign matter.
| (d) Install the rear spoiler seal. |
|
.png)
2. INSTALL NO. 4 REAR SPOILER PROTECTOR
HINT:
- Using the same procedure, install every No. 4 rear spoiler protector.
- When installing the No. 4 rear spoiler protector, heat the rear spoiler assembly using a heat light.
| Item | Temperature |
|---|---|
| Rear Spoiler Assembly | 20 to 30°C (68 to 86°F) |
CAUTION:
- Do not touch the heat light and heated parts, touching the heat light may result in burns.
- Touching heated parts for a long time may result in burns.
NOTICE:
Do not heat the rear spoiler assembly excessively.
(a) Clean the rear spoiler assembly surface.
(1) Using a heat light, heat the rear spoiler assembly surface.
(2) Remove the double-sided tape from the rear spoiler assembly.
(3) Wipe off any tape adhesive residue with cleaner.
(b) Using a heat light, heat the rear spoiler assembly.
(c) Remove the release paper from a new No. 4 rear spoiler protector.
HINT:
After removing the release paper, keep the exposed adhesive free from foreign matter.
| (d) Install the No. 4 rear spoiler protector. |
|
.png)
3. INSTALL NO. 2 REAR SPOILER PROTECTOR
HINT:
- Using the same procedure, install every No. 2 rear spoiler protector.
- When installing the No. 2 rear spoiler protector, heat the rear spoiler assembly using a heat light.
| Item | Temperature |
|---|---|
| Rear Spoiler Assembly | 20 to 30°C (68 to 86°F) |
CAUTION:
- Do not touch the heat light and heated parts, touching the heat light may result in burns.
- Touching heated parts for a long time may result in burns.
NOTICE:
Do not heat the rear spoiler assembly excessively.
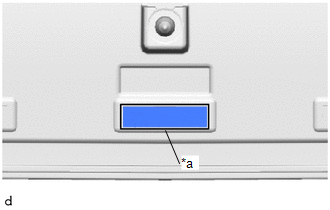
(a) Clean the rear spoiler assembly surface.
(1) Using a heat light, heat the rear spoiler assembly surface.
(2) Remove the double-sided tape from the rear spoiler assembly.
(3) Wipe off any tape adhesive residue with cleaner.
(b) Using a heat light, heat the rear spoiler assembly.
(c) Remove the release paper from a new No. 2 rear spoiler protector.
HINT:
After removing the release paper, keep the exposed adhesive free from foreign matter.
| (d) Install the No. 2 rear spoiler protector as shown in the illustration. HINT: Install the No. 2 rear spoiler protector along the line on the rear spoiler assembly. |
|
4. INSTALL NO. 1 REAR SPOILER PROTECTOR
HINT:
When installing the No. 1 rear spoiler protector, heat the rear spoiler assembly using a heat light.
Heating Temperature| Item | Temperature |
|---|---|
| Rear Spoiler Assembly | 20 to 30°C (68 to 86°F) |
CAUTION:
- Do not touch the heat light and heated parts, touching the heat light may result in burns.
- Touching heated parts for a long time may result in burns.
NOTICE:
Do not heat the rear spoiler assembly excessively.
(a) Clean the rear spoiler assembly surface.
(1) Using a heat light, heat the rear spoiler assembly surface.
(2) Remove the double-sided tape from the rear spoiler assembly.
(3) Wipe off any tape adhesive residue with cleaner.
(b) Using a heat light, heat the rear spoiler assembly.
(c) Remove the release paper from a new No. 1 rear spoiler protector.
HINT:
After removing the release paper, keep the exposed adhesive free from foreign matter.
| (d) Install the No. 1 rear spoiler protector as shown in the illustration. HINT: Install the No. 1 rear spoiler protector along the line on the rear spoiler assembly. |
|
5. INSTALL CENTER STOP LIGHT ASSEMBLY
Click here
.gif)
 Disassembly
DISASSEMBLY PROCEDURE 1. REMOVE CENTER STOP LIGHT ASSEMBLY Click here
2. REMOVE NO. 1 REAR SPOILER PROTECTOR (a) Remove the No. 1 rear spoiler protector...
 Installation
INSTALLATION PROCEDURE 1. INSTALL REAR SPOILER ASSEMBLY (a) Engage the clips to install the rear spoiler assembly.
(b) Install the 2 bolts and 3 nuts...
Other information:
Toyota Yaris XP210 (2020-2024) Reapir and Service Manual: Charge Air Cooler Temperature Sensor Bank 1 Circuit Short to Battery or Open (P007A15)
DESCRIPTION Refer to DTC P007A11. Click here DTC No. Detection Item DTC Detection Condition Trouble Area MIL Note P007A15 Charge Air Cooler Temperature Sensor Bank 1 Circuit Short to Battery or Open The output voltage from the intake air temperature sensor is higher than 4...
Toyota Yaris XP210 (2020-2024) Reapir and Service Manual: Fail-safe Chart
FAIL-SAFE CHART If any of the following DTCs are stored, the ECM enters fail-safe mode to allow the vehicle to be driven temporarily. DTC No. Fail-safe Operation Fail-safe Deactivation Condition P058A01 P062049 P065C07 P160200 P161A87 P162B87 Generator command is fixed...
Categories
- Manuals Home
- Toyota Yaris Owners Manual
- Toyota Yaris Service Manual
- Engine Start Function When Key Battery is Dead
- Diagnostic Trouble Code Chart
- How to connect USB port/Auxiliary jack
- New on site
- Most important about car
Refueling
Before refueling, close all the doors, windows, and the liftgate/trunk lid, and switch the ignition OFF.
To open the fuel-filler lid, pull the remote fuel-filler lid release.
