Toyota Yaris: Radio Antenna Cord / Installation
INSTALLATION
PROCEDURE
1. INSTALL NO. 8 ANTENNA CORD SUB-ASSEMBLY
| (a) Engage the guide to install the No. 8 antenna cord sub-assembly. |
|
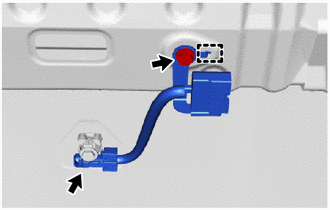
(b) Install the bolt.
Torque:
10 N·m {102 kgf·cm, 7 ft·lbf}
(c) Connect the connector.
2. INSTALL NO. 2 ANTENNA CORD SUB-ASSEMBLY
(a) Apply new butyl tape along the markings, while making sure that the butyl tape does not extend outside of the markings.
 | Butyl Tape | - | - |
NOTICE:
Apply the tape with even pressure, making sure that the tape does not extend outside of the markings of the roof headlining.
(b) Align the marking tape (A) on the No. 2 antenna cord sub-assembly with the protrusion on the front of the roof headlining and wrap a new adhesive tape around the No. 2 antenna cord sub-assembly and protrusion of the roof headlining.
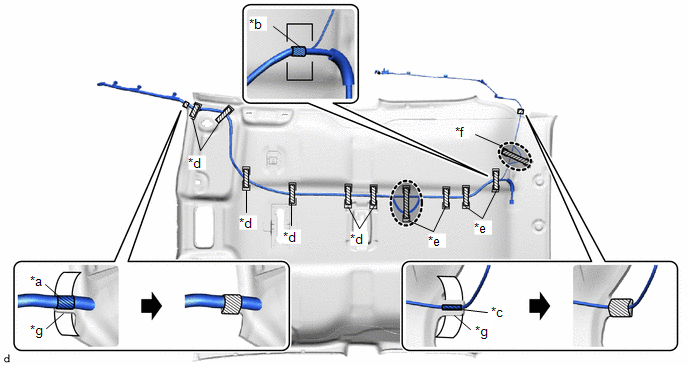
| *a | Marking Tape (A) | *b | Marking Tape (B) |
| *c | Marking Tape (C) | *d | Adhesive Tape (A) |
| *e | Adhesive Tape (B) | *f | Adhesive Tape (C) |
| *g | Protrusion | - | - |
 | Adhesive Tape |
 | Adjustment Area |
(c) Apply the 6 new adhesive tapes (A) as shown in the illustration to secure the No. 2 antenna cord sub-assembly.
(d) Align the marking tape (B) on the No. 2 antenna cord sub-assembly with the marking of the roof headlining.
(e) Apply the 4 new adhesive tapes (B) as shown in the illustration to secure the No. 2 antenna cord sub-assembly.
HINT:
Secure the extra length of the No. 2 antenna cord sub-assembly in the adjustment area as shown in the illustration.
(f) Align the marking tape (C) on the No. 2 antenna cord sub-assembly with the protrusion on the rear of the roof headlining and wrap a new adhesive tape around the No. 2 antenna cord sub-assembly and protrusion of the roof headlining.
(g) Apply the a new adhesive tape (C) as shown in the illustration to secure the No. 2 antenna cord sub-assembly.
HINT:
Secure the extra length of the No. 2 antenna cord sub-assembly in the adjustment area as shown in the illustration.
3. INSTALL ROOF HEADLINING ASSEMBLY
Click here

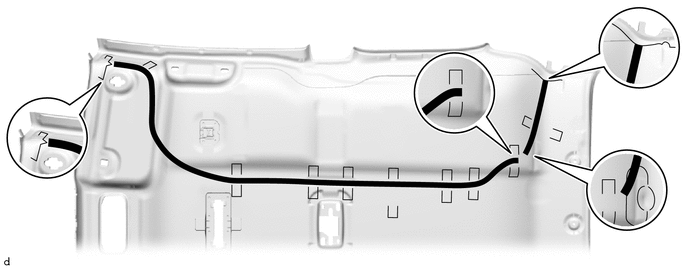
4. INSTALL ANTENNA CORD SUB-ASSEMBLY
(a) Engage the guide and clamps to install the antenna cord sub-assembly.
| *a | Clamp | *b | Guide |
5. INSTALL NO. 2 SIDE DEFROSTER NOZZLE DUCT
Click here

6. INSTALL NO. 1 SIDE DEFROSTER NOZZLE DUCT
Click here

7. INSTALL INSTRUMENT PANEL SUB-ASSEMBLY
Click here

 Removal
REMOVAL CAUTION / NOTICE / HINT HINT: When the cable is disconnected / reconnected to the auxiliary battery terminal, systems temporarily stop operating...
 Roof Antenna
..
Other information:
Toyota Yaris XP210 (2020-2024) Owner's Manual: Declaration of Conformity
K..
Toyota Yaris XP210 (2020-2024) Reapir and Service Manual: Installation
INSTALLATION PROCEDURE 1. INSTALL REAR SEAT INNER BELT ASSEMBLY LH (a) Install the rear seat inner belt assembly LH with the bolt. Torque: 42 N·m {428 kgf·cm, 31 ft·lbf} Protruding Part NOTICE: Do not allow the anchor part of the rear seat inner belt assembly LH to overlap the protruding parts of the vehicle body...
Categories
- Manuals Home
- Toyota Yaris Owners Manual
- Toyota Yaris Service Manual
- How to connect USB port/Auxiliary jack
- Brake System Control Module "A" System Voltage System Voltage Low (C137BA2)
- Starting the Engine
- New on site
- Most important about car
Keys

To use the auxiliary key, press the knob and pull out the auxiliary key from the smart key.
