Toyota Yaris: Rear Trailing Arm / Installation
INSTALLATION
CAUTION / NOTICE / HINT
HINT:
- Use the same procedure for the RH side and LH side.
- The following procedure is for the LH side.
PROCEDURE
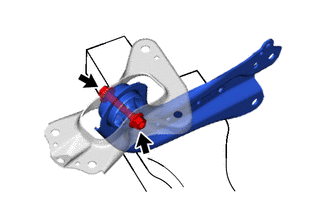
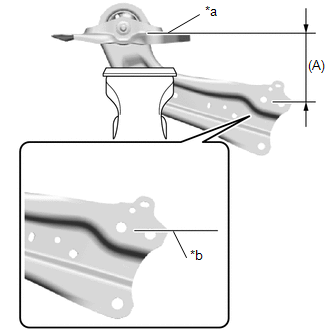
1. INSTALL REAR SUSPENSION ARM BRACKET
| (a) Temporarily install the rear suspension arm bracket to the rear trailing arm assembly with the bolt and nut. NOTICE:
|
|
| (b) Position the rear trailing arm assembly as shown in the illustration. Reference Length (A): 136 mm (5.35 in.) |
|
(c) Fully tighten the nut.
Torque:
120 N·m {1224 kgf·cm, 89 ft·lbf}
NOTICE:
Tighten the nut with the bolt secured.
2. INSTALL REAR NO. 1 SUSPENSION SUPPORT COVER
(a) Engage the 3 claws to install the rear No. 1 suspension support cover.
3. INSTALL REAR TRAILING ARM ASSEMBLY
(a) Using a transmission jack and a wooden block, support the rear No. 2 suspension arm assembly.
NOTICE:
- When jacking up the rear No. 2 suspension arm assembly, be sure to jack it up slowly.
- Make sure to perform this operation with the vehicle kept as low as possible.
(b) Install the rear trailing arm assembly to the vehicle body with the 4 bolts.
Torque:
90 N·m {918 kgf·cm, 66 ft·lbf}
(c) Install the rear trailing arm assembly to the rear axle carrier sub-assembly with the 2 bolts.
Torque:
150 N·m {1530 kgf·cm, 111 ft·lbf}
4. INSTALL REAR SPEED SENSOR
(a) Install the rear speed sensor to the rear trailing arm assembly with the bolt.
Torque:
19 N·m {194 kgf·cm, 14 ft·lbf}
(b) Engage the 3 clamps.
5. INSTALL NO. 3 PARKING BRAKE CABLE ASSEMBLY
(a) Install the No. 3 parking brake cable assembly to the rear trailing arm assembly with the nut.
Torque:
15.5 N·m {158 kgf·cm, 11 ft·lbf}
6. INSTALL REAR STABILIZER LINK ASSEMBLY
Click here

7. INSTALL REAR WHEEL
Click here

8. INSPECT AND ADJUST REAR WHEEL ALIGNMENT
Click here

 Removal
REMOVAL CAUTION / NOTICE / HINT The necessary procedures (adjustment, calibration, initialization, or registration) that must be performed after parts are removed and installed, or replaced during rear trailing arm assembly removal/installation are shown below...
 Rear Upper Arm
ComponentsCOMPONENTS ILLUSTRATION
*1 REAR SUSPENSION MEMBER SUB-ASSEMBLY *2 REAR UPPER CONTROL ARM ASSEMBLY
Tightening torque for "Major areas involving basic vehicle performance such as moving/turning/stopping" : N*m (kgf*cm, ft...
Other information:
Toyota Yaris XP210 (2020-2024) Reapir and Service Manual: Disassembly
DISASSEMBLY PROCEDURE 1. REMOVE MILLIMETER WAVE RADAR SENSOR ASSEMBLY (w/ Pre-collision System) Click here 2. REMOVE NO. 3 ENGINE ROOM WIRE (w/ Pre-collision System) (a) Disengage the clamps to remove the No. 3 engine room wire. 3. REMOVE FOG LIGHT ASSEMBLY LH Click here 4...
Toyota Yaris XP210 (2020-2024) Reapir and Service Manual: No Cool Air Comes Out
DESCRIPTION If warm air blows from the registers regardless of the temperature setting of the air conditioning system, the following factors may be the cause. Symptom Factor No cool air comes out (Blower control is normal) Compressor with pulley assembly malfunction Refrigerant pressure is extremely high or low Refrigerant volume (low) Clogged cooler condenser assembly fins Cooling fan system malfunction Mechanical locking of damper and damper link No...
Categories
- Manuals Home
- Toyota Yaris Owners Manual
- Toyota Yaris Service Manual
- Brake System Control Module "A" System Voltage System Voltage Low (C137BA2)
- Adjustment
- Engine Start Function When Key Battery is Dead
- New on site
- Most important about car
Fuel Gauge
The fuel gauge shows approximately how much fuel is remaining in the tank when the ignition is switched ON. We recommend keeping the tank over 1/4 full.
